Shared posts

05 Jun 16:46

Reader Space: A Little Love, A Big Difference!

by iheartorganizing
I feature a lot of mega makeovers done by readers each week, but sometimes it is those simple and quick projects that hold just as many smiles and downstream impact!  Catch-all drawers and food cabinets are used daily and often endure as much traffic as an entire room.  Taking 15 minutes to give them some love will leave you warm and fuzzy for days to come.  Don't believe me?  Check out these happy projects Iris tackled, I bet you will be smiling too!


Iris had a cabinet for her food....


And a desk drawer for her miscellaneous goodies....


So, she invested a couple of minutes into sorting, streamlining and organizing each area and came out with dashing results.  Here she is now to explain a bit more about each!


What is the main function of each space?

"The drawer belongs to our desk.  When I open it, I expect to find pens, post-it's or even staples {not too much to ask right?}.  It's super tiny and it used to be messy all the time.  Sometimes I would open it and find food, important papers or keys.  "Humm... that's not supposed to be here".  So the first thing I did was to redefine the main function of the drawer and that helped me organize it.  This was definitely not a key holder, or a food cabinet, but a desk drawer.  So, I put stuff that went along with it's function inside.  That may seem logical but trust me, by doing that I emptied half of the drawer.

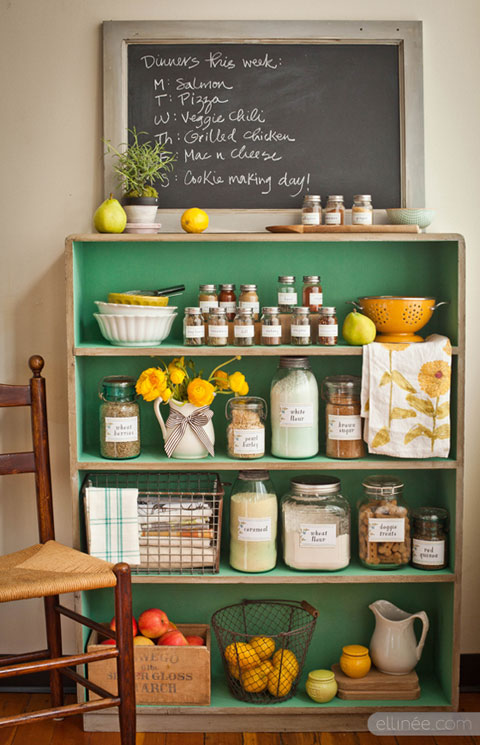
Our little food storage cabinet - as the name says it all - is the place where we store food.  It used to get pretty wild in there.  I didn't like opening this cabinet!  It wasn't pretty, it wasn't organized, it was just messy.  "Beurk" as we say in French. "


Any superstar tips for keeping the spaces organized?

"I am not going to lie, drawers are the worst!  I used to organize them, but they would soon get messy again.  Until I used dividers!

In the drawer:
  1. Use dividers:  It is so important that EACH item has it's own place.  Even the little ones.  You can find cheap but great dividers, I even like to write what belongs in each divider beneath it.  And if you have kids, you can put a drawing of what's supposed to be in the divider as I did here.  Nothing complicated, but trust me it helps keeping it organized.
  2. Make it pretty:  When something looks pretty you just want it to stay that way.  Don't you agree?  That's why I put colors and a nice background in my drawer.  And if you hear yourself say, "Awww, it used to be so pretty in here", then you do what you have to do!
  3. Show it proudly to your husband every week.  Haha, not really. But what I do is that sometimes, I say to my husband, Mathrew, "Hey, you can check al the drawers in our home, they are still clean!"  He'll feel obligated to say something like, "Good job, I'm proud of you", and this will keep me motivated.


    In the cupboard:
    1. Define the main function of the space, and then which items are supposed to go in it.
    2. Use Tupperware containers and label them.  The more you define where items go, the less it will get messy.
    3. Add an inventory.  That's what I did recently here, and it really helps! "


    What items did you find were essential in organizing the spaces, and why?

    "In the drawer, the dividers!  In the cupboard, containers and tupperware were essential, because they makes the food easier to access.  And they are much prettier than the original food boxes."


    What did you do to go the extra mile and "make it pretty"?

    "In the drawer, I "rainbowtized" my pens.  Which is weird.  But it looks good.  Haha!  I put a nice background which makes the drawer so much prettier.


    In the cabinet, I made the shelf liner myself {found a pattern, worked on it, printed it, laminated it and taped it}.  I made the cute labels myself to stay within in my budget, you can find them for free on my blog!" 


    What items did you DIY to stay on a budget?

    "The background.  In the U.S., you have amazing shelf liners, but in France, you can't find many or they are really basic.  However, I decided that this was not going to stop me!  I found a pattern I liked, I worked on it through my computer, I printed it, taped it and TADAA!  Trust me, you don't see the difference, and it was FREE!"


    How have the spaces impacted your life for the better?

    "Every time I ope the little drawer, I feel good.  When I need a pen, I know where to get one, haha!  I don't lose little items {like memory cards, SIM cards, USB key...} anymore.  This made me want to do the same with my other bigger drawers, which I did here and here.


    When I open my food storage cabinet, I feel SO good!  Like I want to do a happy dance or something!  Haha!  I am just happy that the before photo is a long lost memory!"


    Pretty sweet eh?  Those colors had me at hello!  LOVE them!  So happy and bright!

    These projects are a perfect example why I love to do what I do and go the extra mile to add a little color and life to organizing projects.  Some may not understand why I love pretty shelf liner, darling labels, drawer dividers and clear containers.  But Iris said it herself, now when she opens the cupboard door and the drawer, she smiles!  She feels happy!  She is more inclined to keep the spaces organized, because she used simple systems that she adores!  Such an important part of the organizing process.

    Iris has a great time working on fun little organizing projects, and shares all of those details over on her super spunky and darling blog here.  I am wrapping up a huge virtual hug and shipping it all the way over to France to Iris for being so kind to stop by and share her details with us today.

    What do you think?  Do you love those little projects as much as the big?


    ATTENTION!!  Want to be featured in a Reader Space edition?  Have an awesome organizing story to share?  I am looking for projects that have made a positive impact to your life.  Please submit your story and photos here and I would heart to feature them right here, on the blog!!  Photos should be high resolution and unedited.  Please include a description of the project, including any costs, inspiration, and how it has changed your life and routine for the better!  Oh, and no worries my friends, we will NEVER judge "before" pictures because that just wouldn't be nice!  Only love goes on at this blog!

    20 Feb 15:52

    Roupa de cama espacial

    by noreply@blogger.com (ANDRÉ Montejorge)
    Que tal levar o seu filhote para cama em trajes espaciais?! O meu iria ficar enlouquecido! É que o divertidíssimo conjunto de fronha e edredom abaixo tem impressa a réplica exata de uma verdadeira roupa de astronauta, criando um efeito visual muito legal; principalmente quando o futuro viajante das galáxias estiver deitado. A fronha mede 70 x 50 cm e a coberta 140 x 220 cm e está em pré-venda por 59,95 euros. O lançamento espacial tem previsão para o próximo mês. "Antigravitacionalmente legaus"! Link para a loja
    20 Feb 15:52

    Sofá Transformer

    by noreply@blogger.com (ANDRÉ Montejorge)
    Falta de espaço é assunto recorrente em grandes cidades e cada vez mais surgem inovações em móveis do tipo multiuso. Este sofá-mesa da designer ucraniana Julia Kononenko é mais um exemplo bem legal. O Convertible Sofa é um estiloso sofazinho que se transforma numa prática mesinha para refeições e suas almofadas coloridas viram banquetinhas. Uma solução simpática, estilosa e bem útil para pequenas residências. "Transformavelmente legaus"! Link para a página da designer
    12 Feb 11:22

    Porta-iPad de Rei

    by noreply@blogger.com (ANDRÉ Montejorge)
    Luciana Pimentel

    Meu pai eterno!

    Para quem não sacou a brincadeirinha do título, explico: o acessório abaixo é feito para quem curte usar o iPad no trono. Sim, sim, sim! Por mais anti-higiênico que você possa achar, é fato: as pessoas usam sim, e muito, seus gadgets no banheiro. E os tablets, claro, são os preferidos da turma. Já que não dá pra ser discreto, apavore logo de uma vez. É mais ou menos isto que este misto de porta-iPad e papel higiênico deixa claro. Pelo menos dá pra limpar a tela também. Nojento ou não, tá à venda. Os interessados podem saber mais no Amazon, clicando no link após as fotos. Custa U$ 44,99. "Entronadamente legaus"! Link para o Amazon
    08 Feb 23:02

    Mesa flutuante

    by noreply@blogger.com (ANDRÉ Montejorge)
    Minimalista é o termo que resume bem a Float Wall Desk do Orange22 Design Lab. Com linhas simples e bordas arredondadas, ela é uma verdadeira multiuso. Por ser presa à parede e possuir um tampo embutido de puxar, cabe em qualquer cantinho, ocupa pouco espaço e vai de mesa de trabalho à aparador para peças de decoração. A fragilidade é só aparente e ela suporta peso como qualquer outra do mesmo padrão. Com design de Dario Antonioni, custa U$ 699,00. "Flutuantemente legaus"! Link para a loja
    08 Feb 22:59

    Concurso Artesanato Reciclado – Faça arte ajudando o meio ambiente

    by Revista Artesanato
    Luciana Pimentel

    ahahahahahahahaha

    Concurso de reciclagem

    Já pensou em quanto lixo você produz em um dia? Agora multiplique isso por 30, depois multiplique novamente por 12. Essa é a quantidade de lixo que só você produziu em um ano! Inclua agora na conta os seus amigos, parentes, o seu vizinho… É muita coisa, não é mesmo? Pois chegou a hora de você pensar em como produzir menos lixo no seu dia. E uma alternativa é reutilizar objetos presentes em casa para outros fins, como fazer artesanato. Essa é uma ótima opção para diminuir a quantidade de coisas que você joga fora.

    Pensando nessa ideia, vamos lançar no próximo dia 18 de Fevereiro o nosso curso de Reciclagem. Serão ensinadas, passo a passo, várias maneiras de reutilizar objetos comuns em casa, como garrafas pet, caixas de leite, jornal e vários outros fazendo artesanato. O curso será em formato PDF, para ser lido na tela do computador. Nada impresso, pois papel é derivado de árvores e será jogado fora um dia. Não combina com o pensamento de reciclagem, concorda?

    Aproveitando essa onda, queremos despertar em você o gosto pela reciclagem. Por isso, estamos lançando esse concurso! Para você fazer algo reciclado e mandar a foto para nós.

    Como funciona o concurso

    A ideia é você fazer um artesanato com material reciclado e mandar a foto pra gente. Após recebermos todas as fotos, vamos escolher as 5 melhores e fazer um post especial, divulgando as pessoas que fizeram esses melhores trabalhos. É super legal, chame os seus amigos para fazer também!

    Você pode mandar qualquer trabalho feito com material reciclado. Para quem não sabe o que fazer, damos três sugestões, nas fotos abaixo.

    Passos para participar do concurso

    1) Faça um artesanato com material reciclado. Pode ser um desses exemplos das fotos abaixo ou outro que você quiser.

    2) Envie a foto do trabalho realizado pra gente, através do e-mail contato@revistaartesanato.com.br

    3) Juntamente com as fotos, envie o seu nome e os dados que deseja que apareçam no post caso a sua foto seja escolhida. As fotos devem ser enviadas até o dia 20 de Fevereiro

    4) Vamos escolher as melhores fotos e fazer um post com elas e os dados de quem fez o trabalho no dia 25 de Fevereiro.

    5) Dos 5 escolhidos, o melhor vai ganhar o curso de reciclagem!

    Sugestões de trabalhos para fazer

    Caso você não saiba o que fazer, damos três ideias:

    Maçã de garrafa PET

     Clique aqui para aprender a fazer as maçãs de garrafa PET

     Cofrinho de garrafa PET

    Lata decorada

    Veja como fazer a latinha decorada com tecido e a latinha revestida.

    Fale para todo mundo que você está participando

    Você está participando do concurso e quer que todo mundo saiba? Preparamos o banner abaixo para você colocar em seu blog, facebook, etc…

    Banner concurso de reciclagem

    07 Feb 22:28

    ...

    by Jen
    07 Feb 11:45

    Stalking a house of blocks

    by midcenturyjo

    A house with definite ideas on inside out living. A series of cubes that almost tumble across the small inner city block. Open plan living with a separate bedroom pavilion. I'm stalking a townhouse in Prahran, Melbourne. Love the change of levels and the courtyard. Link here while it lasts.

    07 Feb 11:14

    Monthly Organizing Challenge: Kitchen Intro

    by iheartorganizing
    Happy February my bloggy pals!

    I am back to launch another monthly challenge, this month we are tackling the hub of the home, the KITCHEN!


    It's all about sharing ideas, working together and conquering our organizing projects one step at a time.  And organizing is so much more fun when you have someone to do it with {or hundreds of people to do it with}, so let's do this together!

    To kick things off let's chat about some of my favorite kitchen organizing tips:
    • Counter clutter is typically the top culprit in the kitchen.  Determine why your counter clutter is appearing and create solutions for those items.  Temporary papers, give them a review basket.  Returns?  Pop a bag or bin in your coat closet that you can grab when you head to the store.   Dishes?  Set a goal to do them each evening before you head to bed.
    • Drawer dividers will be your best friend in the kitchen.  By adding dividers to the drawers, you have to think about and categorize your belongings.  It forces you to edit what you put into the drawers {no more just tossing everything in}, and also helps you quickly find what you are looking for without digging endlessly for that garlic press.
    • Edit down your small kitchen tools.  It's amazing how many items a good knife can replace.  Donate duplicate items and keep the pieces that serve multiple functions.
    • Store dried goods in clear, air-tight containers.  This prolongs the life of the foods and always gives you a quick visual inventory of your pantry stock.
    • Create a meal plan for your family.  Just a couple minutes of planning during the weekend can save you boatloads of time, money and frustration when the busy week hits.  
    • Don't be afraid to start with a blank slate.  Take everything out of your cabinets and be selective about what you put back.  Dispose of expired foods and think about how you use your kitchen each day.  Put pans near the stove and dishes near the dishwasher.  Keep children's dishes in low cabinets or drawers for kids to reach.  Just because a cabinet is typically intended for a single purpose, don't be afraid to challenge that and use it for how it makes the most sense for you.
    • Use lazy susans and tiered shelving to maximize shelf space and to make items in your cabinets easier to view and access.
    • Consider the frequency of use of your small appliances.  There are so many specialty items such as quesadilla makers and panini presses that are only used a few times per year.  If you are low on cabinet space, it may be time to pair down the small appliances that take up so much room.
    • Use pull out shelves and drawers within your cabinets to give yourself easy access to items in the back of the cupboard.
    • Remember there is a lot of unused space in the kitchen on the backs of cabinets and doors.  Command hooks, over the door organizers and cork tiles are all great items that can provide extra storage where you would least expect it.
    • Clean out your fridge and freezer and take inventory of the contents to make meal planning easier and to reduce over-purchasing at the grocery store.


    So where does one begin?
    1. Make a list of things you are hoping to tackle this month to get your kitchen in working order.  Be realistic and only take on what you can commit to and pick your battles.  It doesn't have to be an entire space overhaul, just enough to feel stress free about your time in the kitchen each day.
    2. Find inspiration.  Check out the www and your favorite magazines for ideas and products to spark your creativity.
    3. Schedule it in!  Make time to get it done, whether it is 15 minutes per day or an hour on a weekend.  Ask for help watching the kids or get them involved to help with sorting and any crafting.
    4. Blank slate it!  Anytime I take on an organizing project, it is great to start with a blank slate.  It allows you to properly evaluate what you have and place things back where they make the most sense vs. where they have been for the last eight years.
    5. Sort.  Sort down your contents into categories and piles.  Make sure you have a purge pile!  It's time to clear out the clutter!
    6. Purge.  Say farewell to all of those things holding you back from living simply.  Only keep what you need and love, say farewell to all the rest.  Sell on Craigslist, donate to Goodwill, recycle recycle recycle.
    7. Store it!  Now that you have cleared the clutter, it is time to store the remaining items.  Use what you have and shop your home for additional items.  Check out thrift stores, the dollar store or the Container Store to find things that fit your storage needs.  Or, DIY your own storage for a custom fit, to save moolah and because crafting and projecting is fun!
    8. Share it!  Blog about your projects and share them with the world!  You have just accomplished something, you should be proud!  At the end of the month, we will link up all of our projects and share the ideas and inspiration with the IHeart Organizing community!


    This blog isn't just about organizing, it's about getting your hands dirty.  Whether making a tag from scrapbooking supplies or re-purposing a wine crate as pantry storage.... let's dare to DIY something fun while working on our kitchen spaces!

    To not only bring us some inspiration, but to also spark a few DIY ideas, here are a few that have recently caught my eye:

    • Add additional storage by making over a bookcase.  Go the extra mile and DIY some pretty labels for dry goods.
    {source}
     
    • DIY a lovely little recipe box.
    {source}

    • And then use those recipes to plan your weekly menu on a pretty menu board.
    {source}

    • Keep track of your grocery list on a pretty chalkboard tablet created from an old cutting board.
    {source}

    • Use standard hardware from a Home Improvement store to create easy to access utensil storage.
    {source}

    • Line your drawers with pretty papers.


    • Paint the inside of your cabinets or panty for an unexpected happy surprise.
    {source}

    • Get creative when storing your spices.
    {source}

    • Repurpose an old cabinet or armoire as a pantry.
    {source}


    So who is excited to tackle the kitchen with me?  I will be sharing a few of our projects along the way this month, but what I am most excited about is seeing yours at the end of the month during the Link Party!

    What other kitchen organizing tips do you have to share to kick off the challenge?  Any projects that are working wonders for you?  How about favorite product picks that you couldn't function without?


    25 Jan 16:17

    Filmes temperados

    by noreply@blogger.com (ANDRÉ Montejorge)
    Hoje praticamente todo mundo tem câmera fotográfica. Seja no sentido literal da palavra, ou embutida em celulares, tablets, etc. Mas nem sempre foi assim. Quantos e quantos filmes eu comprei, tirei um monte de fotos e depois de esperar pela revelação acabei descobrindo que elas ficaram horríveis, desfocadas, cortadas ou pior dos pesadelos: foram veladas. Como saudosismo pouco é bobagem, os rolinhos de filme ainda provocam fortes emoções em quem vivenciou esta longa época. Escrevi tudo isto só para falar desta dupla de saleiro e pimenteiro que sem dúvida vai deixar muita gente ávida para ter em casa. Pode não ser de 12, 24 ou 36 poses, mas sem dúvida vai trazer boas lembranças à mesa. O kit sai por U$ 15,00 na sempre genial Photojojo. “Revelantemente legaus”! Link para a Photojojo
    25 Jan 16:16

    ...

    by Jen
    17 Jan 16:13

    Arranhadores e casinhas RONRON

    by Ana Paula :)

    Tenho vontade de fazer esse post desde que São Jorge me mostrou o site e comprou uma casinha para o Magnus, Mia e Boo.
    Achei tudo muito lindo, fofo e feito com carinho para nossos bichanos!
    Tudo é feito em MDF e os formatos e recortes deixam tudo mais divertido.

    ADMIRAL2__00165_zoompao_de_açucar_azul__80981_zoomInfinit__59359_zoom

    A parte inferior é feita como uma gaveta para facilitar a limpeza. Isso foi algo que sempre me preocupou nessas casinhas fechadas!
    E a parte “de arranhar” pode ser trocada quando ficar “feia” :)

    Velcro__77155_zoomfundo_bandeja__01455_zoom

    Os arranhadores não são baratos, mas pelo que o Jorge disse, são MUITO bem feitos e a entrega foi super, megar, hyper rápida, no dia seguinte a compra … o que é importante … ainda mais se você nasceu de 6 meses com eu :)

    E agora ainda tem os potinhos para água e ração <3


    408606_326393087462623_1019200647_n

    Só queria ter a opção de mais potinhos juntos no mesmo comedor.

    20130115_223022

    Em casa são 4 … #T7, Electra, Valkirye e Douglas … ficaria bem mais fácil ter tudo junto em um ligar só :)

    Tem tudo AQUI :)

    17 Jan 16:11

    Durex elegante

    by ligiafascioni

    Ok, a marca da fita adesiva não é Durex, é Mmiinn X-Tape, mas a ideia é a mesma. Só que muuuuito mais charmosa.

    Olha como eles conseguem fazer uma caixa sem graça ficar interessante; adoro empresas que se esmeram em fazer o mundo um lugar mais curioso e instigante. E você?

    Achei no sempre ótimo Like Cool e tem pra vender aqui.

    17 Jan 16:09

    Legocóptero

    by noreply@blogger.com (ANDRÉ Montejorge)
    Antes de mais nada você não precisa ficar frustrado por nunca ter montado uma versão espetacular usando bloquinhos de Lego. Afinal, alguns cidadãos como o Ryan “The BrickMan” McNaught, são profissionais certificados Lego, ou seja: o buraco (de encaixe) é bem mais embaixo, né?! Pois ele é o autor deste fantástico helicóptero Sikorsky S-64F Skycrane da Erickson Air-Crane feito com insanas mais de 100.000 peças. Batizada de Elvis, a máquina voadora é fidelíssima ao modelo original (veja no Google) e foi criada em cerca de 1 mês para a Brickvention 2013, que começa neste fim de semana em Victoria, na Austrália. Quem quiser ver mais fotos, clique no link ao final das imagens. "Voadoramente legaus"!
    Link para o Flickr de Ryan
    17 Jan 16:08

    MyThai

    by Jessica Sanchez

    "This Thai restaurant in Rio de Janeiro, Brazil, combines two concepts—healthy food and fast food. The contradiction is reflected in an ambigram, a revolving logo that reads the same upside-down, by New York’s de Vicq design. The brand imagery is furthered with Thai dancers, Buddha’s hands and lotus flowers all to set the mood of Thai culture and cuisine."


    16 Jan 15:49

    Bolos de babar

    by noreply@blogger.com (ANDRÉ Montejorge)
    Eu já postei outros bolos incríveis aqui no blog, mas não canso de me surpreender com o nível de alguns cake designers. Não à toa que vemos no canais de tv por assinatura uma gama enorme de programas, séries e reality shows sobre o tema. Hoje eu ia postar apenas o capacete de um Stormtrooper (Star Wars), mas quando vi o que a Mike's Amazing Cakes fazia, resolvi ampliar e mostrar outros bolos fantásticos! Minha única dúvida fica sempre em saber se eles são tão gostosos como bonitos. De qualquer forma, a qualidade final e o absurdo detalhamento sempre me impressionam. Selecionei alguns que mais gostei, mas o link para o FB deles está após as fotos. "Confeitadamente legaus"! *O bolo abaixo foi feito para o escritório do Google em Seattle. O tamanho impressiona. Link para o Facebook da Mike's Amazing Cakes
    16 Jan 15:49

    Armários de bichinhos

    by noreply@blogger.com (ANDRÉ Montejorge)
    O título não está errado não, é isto mesmo! A Modernistcat desenvolve móveis para quem tem animais de estimação; gatos principalmente (dá pra notar pelo nome, né?!). Este das fotos abaixo é da linha Circa50. Além dele que é o formato padrão, ainda tem mais dois modelos e uma bancadinha para potes de ração e água. Os armarinhos possuem portas de abertura simples e sem travas para facilitar o acesso, recortes laterais para ventilação e entradas que também funcionam como "janela" ou para fazer uma ligação no caso de se emendar mais de uma peça. Além disto, pagando como opcionais, o seu Circa50 pode ser personalizado. No próprio site você escolhe entradas redondas ou quadradas, cor da madeira externa, das portas, do interior e da almofadinha. O preço porém não é de se abanar o rabinho: os compactos saem por U$ 479 e o standard por U$ 599, sem customizações. "Confortavelmente legaus"! Link para a Modernistcat
    16 Jan 15:46

    http://pratamadabrasil.blogspot.com/2013/01/blog-post.html

    by Pratamada Brasil
    Pingente Cruz Eighteen


    Prata 950 com granada carré

    15 Jan 17:13

    Talking Managing Clients, Starting Out and More with Joshua Smith aka Hydro74

    by James Andrew

    Orlando based Hydro74 has racked up a list of impressive clients ranging from Nike to Levi’s and MTV to Burton Snowboards. The following interview will give an insight into the work experience, visual style and career decisions that makes Hydro74 a successful global freelance illustrator. Hydro’s portfolio is packed full of unique type treatments and illustrations, which of course makes him perfect for an interview with Vectortuts+. Owner and manager of Hydro74, Joshua Smith takes time out to answer the questions.

    I want to be better, I want to be more refined and be able to perfect something that can never be perfected. What I have achieved didn’t happen over night, it happened over years of failing and trying again.

    Q
    Can you describe your design education and why you made the decision to start a career in the creative arts?

    I never wanted to be a designer when I first began. I was going to college to be a teacher and never considered the aspect of design. I never thought highly of the career nor would of considered it. After a short period in college I realized I wasn’t going to enter the teaching program as the tutors didn’t think I would be a good "representation" of the college because I was a poor punk kid. More so on the poor side and didn’t care about the clothes I wore. I got pretty p****d off at the school and decided to switch to Liberal Arts where I started to increase my painting and drawing classes to get my GPA (Grade Point Average) higher and figure out what I should study.

    Later I decided to take a Visual Communications class, mostly because a girl from Alaska that I wanted to date took the class too. During that time the professor taught me a lot of pre-computer methods and I started learning how to use the computer to generate graphics.

    A friend asked me to assist with his music site at that the time so I drew up some s****y looking anime characters, which eventually caught the attention of a couple record companies who hired me. I then started posting a few pieces on Geocities showing off my horrible skills and found that I was getting halfway decent paid jobs and since I was poor these jobs encouraged me to learn more thus starting the path to my career.

    Q
    Did you work for any company(s) before you made the move to become freelance?

    Yes, when I started out I was employed at a Skateboard/Silk Screen company located in Grand Rapids, here I assisted in creating web graphics, a few adverts and prep work on some client files that we were printing. Shortly after I worked at a small agency that worked with the Christian Bible market, I then took a job working with a BMX company.

    My first passion proved to be working within the action sports scene as there appeared to be a sense of freedom. The BMX job in Dayton didn’t last long but I learned a lot during my time here before taking a job in Orlando, Florida as a Art Director then as a Creative Director at a magazine.

    Several years later I got to a point where I couldn’t stand the owner and his work ethics and I decided to go full time freelance. The owner of the magazine was a amazingly skilled man and had a great taste in talent but had this uncanny way of working employees 60+ hours a week. After 4 years of this I had to quit.

    The moment I went full-time with Hydro74 was the moment of no turning back. It was always my desire to make in it on my own and to prove I could work for myself as well striving to better my career.

    Q
    How did you refine your skills and gain experience?

    Lots of hard work, time and sacrifices. I was, and still am passionate about wanting to learn more and pushing myself further. I found that my work motivates me and I’m never satisfied with what I achieve. I want to be better, I want to be more refined and be able to perfect something that can never be perfected. What I have achieved didn’t happen over night, it happened over years of failing and trying again. My work eventually clicked.

    Q
    How do you take your raw ideas and develop them in to a finished piece? Say for example the Halftone Prints.

    Every piece has a different approach. I might sketch something and use that as a guide for Adobe Illustrator or I might put together references and create blue print with lines and circles to define where things should go. Other times I just open up Illustrator and start clicking away to see what I can create.

    For the halftone prints my goal was to challenge myself and find a new technique using halftones more as the highlight than a solid back. Adobe Illustrator actually sucks a** when it comes to this where Freehand (which Adobe purchased years back) succeeded. That technology of halftone control in a vector application (Freehand) was pretty amazing and I knew there had to be a method in Illustrator (as s****y as it might be) and I started working on the illustration.

    When I do personal illustrations, it’s for one of two reasons:

    • To push myself and learn a new technique or push to figure a new method to better my talent.
    • A warm up piece for a big client project to get my creative and technique right.

    Also, I DO NOT use a graphics tablet. It’s all mouse. I personally love controlling the lines and want to avoid anything that looks like it was created with a Blob Brush Tool or a brush and have that imperfection of it being inked.

    Q
    What inspires your ideas? What visual sources do you research?

    Everyday is different to be honest. There are a lot of artist that piss me off (because they are too good) and I challenge myself to do better (which I never come close, I set my standard too high I guess). A lot of times I’ll reference pen and ink artist from the 60′s-90′s and to strive to figure out their techniques in a digital form.

    Most of the time research will be dictated by what the client has briefed me on and what they require helps my research. I then find a good reference and incorporate it into my own style and technique. So yeah, pretty hard to say what I’m inspired by on a daily basis and I’m always researching for that thing that visually turns me on and makes me feel like I want to do better or create better.

    Q
    What methods do you employ to gain commissions? Do you have an agent?

    It’s all networking. Years of knowing people and working with clients has been the core of my success. I don’t have an agent, but I am looking and everything else tends to be accidental clicking on my site or social connections.

    Q
    Can you talk our readers through the process of working with clients please?

    I’m probably not the role model for this. Whenever ever I get connected with a client we go back and forth a few times trying to figure out what is needed and trying to see who is going to show their cards first on the budget. A lot of times I counter if I feel the budget isn’t up to what I feel my work and efforts are worth. Through that process it is just a matter of emailing back and forth till some early proofs are fleshed out and sent to the client. I then wait for revisions.

    Since I only choose to work with established companies I can trust the invoices will be paid on time at the end of the project, or half of the fee halfway through the project if it is pretty big. Generally there are revisions after the project is signed off and I charge a rate for these as well because I like to avoid time waster clients that tend to say "they know it when they see it". That is fine, but you are going to pay for that time as well until you see "it".

    Q
    Finally do you have any advice on managing projects?

    Ultimately you need to create a core set of personal standards and self worth. You don’t need to take on everything and you are able to argue a point to a client if you feel your vision is worth being heard. Having the ability to defend your work is just as important as the creative. Always be respectful and yes, I tend to promote the fact I’m a a*****e redneck from Florida but in the end I’ve learned that each client is no different than the rest of us. They desire to get a project done, go home and not have to stress over work.

    If you don’t like the budget, pass or counter. If you feel the client is working you to hard or too many hours, tell them and see what they can add to the budget to make the project value worth the effort. Set up your standards in the beginning for how many revisions or how much time you are willing to invest for the budget. I’ve learned a long time ago that clients get their budgets from other departments thus have no control over rates, but they will get your back if you are on the same page and hopefully they will work for you to get a better fee.

    I hope my answers help, it is probably not the greatest advice or anything revolutionary, but that is what I know.

    Hydro74 on the web

    Hydro is currently working with Lucas Film. You can keep update with his work and movements here:

    15 Jan 16:29

    After being away from home for a week, this is what I found when I got back:

    actualhedgehogmartinfreeman:

    superpsychgeek:

    littletechieasian:

    image

    GUYS.

    I DON’T THINK YOU UNDERSTAND.

    image

    mY PARENTS PAINTED MY FUCKIGN DOOR.

    IT’S ALL HAND PAINTED.

    image

    GUYS.

    IM BASICALLY SLEEPING INSIDE THE TARDIS.

    image

    omg IT’S BIGGER ON THE INSIDE. *dead*

    image

    Your parents are wonderful parents.

    15 Jan 16:17

    Downtown Abbey Party {adult party ideas}

    by Rachelle Brancato
    SHARE Tweet LoadingFavorite
    Downtown Abbey Party {adult party ideas}

    Downtown Abbey Party {adult party ideas}

    “What is a weekend?” Recognize the Dowager Countess quote? In honor of the premiere of season 3, My Sister’s Suitcase has put together some amazing ideas to throw a Downtown Abbey Party. She includes a premiere invitation, paper dolls, an aristocratic name game and cookie ideas.

    http://www.sisterssuitcaseblog.com

    15 Jan 16:16

    Big-Ass Book of Bling review and giveaway.

    by Amy

    Big-Ass Book of Bling

    I’m a big fan of Mark Montano and his Big-Ass series. If you don’t know what I’m talking about, it has nothing to do with body parts: it’s all about crafts! The Big-Ass Book of Bling is the latest book in the series, and it’s bling-tastic! Big-Ass Book of Bling is filled with instructions for making fashion-forward and funky necklaces, rings, earring, headbands, belts, pocketbooks, hatpins, cufflinks, epaulettes, brooches, shoe clips and much more. BABB also provides ideas for adding some sparkle on last season’s shoes or putting to use that piece of broken jewelry you’ve been saving, as well as hundreds of original DIY projects made from scratch. For both beginnings and experts alike, and made from recycled and household materials, BBAB is designed for real people with real budgets looking to get creative.

    There are over 150 projects in this book. Amazing! Here are some bling-y crafts by Mark to get you inspired:

    Crafty-Chica-Sugar-Skull-Patch-Cuff-Bracelet-DIY-by-Mark-Montano-on-Make-Your-Mark-Final-Project

    DSCN6883

    full_Screen_Shot_2012-11-09_at_01.03.23

    glass rings

    Get a copy of The Big-Ass Book of Bling and you won’t be disappointed. Of course, if you’d like to try to win a copy, I’m giving one away this week. Enter below.

    a Rafflecopter giveaway

    15 Jan 16:16

    Papercut Shadow Puppets by Su Owen

    by kristen

    My paper-loving heart went pitter pat the moment I laid eyes upon these awesome papercut shadow puppets by Su Owen. The whimsical, hand cut papercuts include circus and fairy tale-themed designs and smile-inducing details like the Circus Strongman’s tattoo and fuzzy armpit hair. Love it!

    Papercut Shadow Puppets by Su Owen

    Papercut Shadow Puppets by Su Owen

    Papercut Fox Shadow Puppet by Su Owen

    images from Su Owen

    15 Jan 16:16

    Segunda com cor

    by Layla Selestrini
    Imagem daqui
    Cores vivas dão sempre um efeito lindo em ambientes predominantemente neutros #ficaadica

    Gente, não esqueci de terminar a série "10 coisas simples..." não, ok? Amanhã tem o final dela. Fiquei feliz que vocês tão gostando, só não tive tempo ainda de responder os comentários ;D

    15 Jan 16:02

    38º Sketchcrawl!

    by noreply@blogger.com (Bajzek)
    Para quem é apaixonado por desenho e para quem apenas flerta com essa arte.
    Para quem gosta de arquitetura e para quem se encanta com o simples movimento das pessoas.
    Para profissionais e estudantes.
    Arquitetos, ilustradores, designers, curiosos.
    Sábado, dia 19 de janeiro é dia de Sketchcrawl, em um dos maiores icones arquitetonicos de São Paulo, o Sesc Pompéia, que vocês já viram retratado em muitos posts neste blog.

    O sketchcrawl é um evento realizado periodicamente (a cada três meses, em geral) e reúne milhares de desenhistas pelo desenho no mundo todo. Não é preciso ser profissional, qualquer um pode participar.
    Em cada evento uma data é definida, e as pessoas se reúnem em suas cidades em locais pré-determinados. Forme um grupo em sua cidade e participe desse grande ‘maratona’ de desenhos. Se não conseguir formar um grupo, vá sozinho. Todos podem compartilhar seus desenhos no fórum internacional do grupo (http://www.sketchcrawl.com/forum/)

    O evento contará com o apoio da Papelaria Universitária, que nos acompanha desde abril de 2012, na 35º versão do evento, fornecendo brindes como camisetas, cadernos customizados e materiais de desenho.
     

    Não é necessário se inscrever. Leve apenas seu material de desenhos e divirta-se!


    Arte do cartaz by myself! ;)


    15 Jan 16:02

    Viagem para a Serra da Mantiqueira I

    by noreply@blogger.com (Bajzek)
    Passei alguns dias viajando de carro pela Serra da Mantiqueira, entre Monte Verde e São Francisco Xavier.
    Minha primeira parada foi em Monte Verde, onde me hospedei na Pousada Provence Cottage & Bistrô

     
    A pousada é linda e muito confortável, em meio a um bosque e decorada cuidadosamente...Eu fiquei entusiasmado assim que cheguei, imaginando que teria muita inspiração para desenhar e pintar ali. Assim que me estabeleci, fiz as duas aquarelas acima.
    O atendimento dos dois sócios da pousada é excepcional, ambos muito educados e atenciosos. Um deles é chef de cozinha e cria as receitas deliciosas do Bistrô. É interessante observar, de perto, uma pessoa com tanto talento para cozinhar. O cara é um artista!

    Monte Verde é uma cidade pequena e  muito agradável, cheia de bons lugares para comer, como o Paulo das Trutas, onde fiz o desenho acima.
    Outro atrativo que me chamou a atenção foram as inumeras trilhas para os picos da região, que chegam a atingir 2080 metros de altitude.
    Eu fiz duas dessas trilhas, e obviamente carreguei meu sketchbook na mochila. Desenhar em lugares assim é um bom fechamento para uma aventura. No caso do desenho abaixo, ventava muito! O sketchbook balançava na minha mão...tratei de agir rápido, mas tomei muito cuidado para não deixar rolar nenhum marcador pedra abaixo. Devo ter levado cerca de 15 minutos para fazer este desenho.


    Em breve postarei mais dessa viagem.
    Abraços e ótimo 2013!
    15 Jan 15:29

    sweet 50 ;)

    by agnieszka


    .... i na tę okoliczność pocięłam Białą Różę
    15 Jan 15:11

    Four Smurfs Arrested In Australia After Mini Crime Spree

    smuft-bandits.jpg Mini, get it? Because they're Smurfs and Smurfs are small. Seen here looking even dumber than they did in my mind prior to seeing a picture, three of the four teenage Smurfs that were arrested following a crime spree in Australia are seen on a 7-11's security footage. The Smurfs was arrested after trying to hotwire a car. Oh, and beating up a guy who gave one of them a free cigarette but wouldn't light it. Wait -- so he gave you a cigarette, and then you beat him up? Those might be the worst manners I've ever heard of. Thankfully, the blue man group turned themselves in after the security camera footage was released and they realized they were the world's saddest criminals and could probably benefit from a little butt-love in the clink. I hereby sentence you to...death at Gargamel's hand, MWAHAHAHAHA! "Jesus, GW, don't you think that's a little steep?" *looking at picture* No, no I do not. Hit the jump for the security camera footage of them buying energy drinks and scratching their asses. Thanks to Jaucet and LupusYonderboy, who tried robbing a bank dressed as Snorks but passed out from holding their breath pretending to be underwater.
    15 Jan 15:11

    FieldCandy. Tents Cool Enough To Get Anyone - Even Me - To Consider Sleeping Outdoors.

    by laura sweet


    While it's not quite glamping, FieldCandy tents certainly up the hip quotient to sleeping in the great outdoors. Perfect for Music Festivals, traditional camping and even for a night in the backyard, FieldCandy tents are made in the UK, high performance, hardy expedition tents with classic ‘A’ frame storm tent construction and digitally printed flysheets (or covers).


    The digitally printed flysheets are what make these tents stand out from any other. Limited editions by contemporary artists, photographic images of food, textures and trompe l'oeil, and everything from clever to edgy to cute.


    With tons of options (over 50!) to choose from, all the FieldCandy tents are made of 100% polyester and are waterproof to a minimum of 3m hydrostatic head. Fire retardant to EU & US standard, they are also flex and tear tested, highly UV fade resistant, treated with Ultra-Fresh and coated with fluorocarbon (Teflon) for ultimate strength and durability.

    Here are a few of my favorites:


    The Inner Tent
    FieldCandy's inner tent is 100% natural cotton, that's breathable - result a dry and comfortable nights sleep:


    What's in the box:


    Product Features:

    Heavy Duty Zip
    We only use zips from the worlds leading zipper manufacturer YKK, your flysheet will feature a particularly heavy duty YKK zip with large inner and outer toggle protected by a Velcro zip cover.

    Pegging points
    FieldCandy tents have extra pegging strong elastic and adjustable pegging points for security and stability, designed to prevent roof dipping and groundsheet rucking, with storm guy lines for extra protection in bad weather.

    Extra strong pegs
    Completely different from old fashioned tent pegs, FieldCandy pegs are a new design from hardened aluminum, extra strong, designed not to bend with a handy little hole for your custom peg puller.

    Every FieldCandy tent comes with spare tent pegs, so don’t worry if there are pegs left over, even when all the pegging points are full. A hammer comes as standard that saves hurting your foot pushing the pegs in.

    Easy set up poles
    High quality, high strength, low weight precision engineered Aluminum Alloy poles in silver.

    You will be amazed how quick and easy it is to set up the tent poles. Hold each pole at one end, give a little 'wiggle' and they slot together all by themselves. Very clever. They are environmentally friendlier, stronger and lighter than standard poles.

    Breathable Cotton Inner Tent
    When you breath you create moisture, most modern day tents are made from plastic so there is nowhere for that moisture to go - result misery. FieldCandy's inner tent is 100% natural cotton, that's breathable - result a dry and comfortable nights sleep.

    Sewing & Sealing
    FieldCandy inner tents are sewn with cotton and the flysheets with treated polyester, both through flat felled seams, which are then seam sealed for maximum performance.

    Spacious sleeping area
    Larger than other two person tents, the light grey interior creates a sleep-inducing environment for a more comfortable night. With a mesh window for ventilation and increased light, along with a lantern hanging point for those dark cosy evenings.

    Safe as well, your inner tent is fire retardant to EU and US standard CPAI-84, but please always make sure that all cooking, fire lighting, smoking etc. takes place a safe distance away.

    Lockable storage pockets
    No tent can be 100% secure, but most thefts are opportunist - so reduce the risk with your valuables by locking them away in the four pockets that lock with the combination padlocks provided.

    There’s masses of other handy storage places, four see-through storage pockets and two mobile phone / MP3 pockets, for all those important bits and pieces.

    Sizes & Weight
    Outer dimensions: 3.55m (L) x 1.7m (W) x 1.4m (H) or 11'8" (L) x 5'7" (W) x 4'7" (H)
    Inner dimensions: 2.65m (L) x 1.5m (W) x 1.3m (H) or 8'8" (L) x 4'11" (W) x 4'3" (H)
    Carry bag: 0.6m (L) x 0.2m (W) x 0.25 (H) or 1'11" (L) x 8" (W) x 8" (H)
    Weight including accessories: 7.4Kg / 16.3lb
    Weight complete tent only: 6.3kg / 13.9lb

    Instructions
    Although very easy to pitch, FieldCandy tents are supplied with practically indestructible, waterproof instructions just in case!

    Owners Manual
    Wherever you pitch your FieldCandy tent, expect questions. Your Owners Manual contains many of the answers. It also, of course, tells you how to use and care for your tent.

    Authenticity
    FieldCandy certifies that your tent is authentic and one of a limited edition of an exclusive design manufactured and sold in accordance with our policies and standards. This certificate is issued after your tent has passed all quality checks and immediately before it is packed for shipping. It is genuine only if it displays the authorised stamp of Outstanding Tents Limited.

    FieldCandy is the Registered Trade Mark ® of Outstanding Tents Ltd, based in Jersey, our design office is in the mountains of Italy, and our products are printed, manufactured, assembled and distributed worldwide from ENGLAND.

    See and shop all the FieldCandy tents here

    all images courtesy of FieldCandy http://ifitshipitshere.blogspot.com/feeds/posts/default?alt=rss
    15 Jan 15:04

    Organizadores construtores

    by noreply@blogger.com (ANDRÉ Montejorge)
    Se você gosta de manter a sua mesa arrumada, seja no trabalho ou em casa, mas tá cansado de potinhos cromados e outros itens de gosto duvidoso (como os de acrílico), vai curtir estas três criações do designer Héctor Serrano. Um navio, uma cidade e uma fábrica formados por recipientes de vários tamanhos e formatos. Além de diferentes e garantirem um toque bem humorado à qualquer mesa, eles são extremamente funcionais, permitindo que se organize os mais variados objetos de escritório. Feitos em porcelana, cada conjunto sai por U$ 58,00. "Organizantemente legaus"! Link para a A+R Store