Submitted by: Unknown
Psychosako
Shared posts
12 May 17:31


Nappy Blob Blob, Jen
by john (the hubby of Jen)
Today isn't like any other day, friends, because today is Jen's birthday. Today.
So please join me in a hearty, boisterous, thundering rendition of this recently free-to-use song!
♫ Haaaaappy Bulhedoy... ♪

TO YOU!
APP
HIIIIIRTY
BDAAAAAYH!!!

TOOO YOU!!!
Haaappy BIRTHDAAAAAY!!!

Dear Sugar Briiiiitches...
(That's what we call each other)
HAAAAPPY...


Eh, close enough.

Thanks to Hailey R., Anony M., Haley B., Connie M., Courtenay V., Lisa, Lorena, & Melanie W., who all appreciate Jen's HUGE tracts of... talent.
*****
Thank you for using our Amazon links to shop! USA, UK, Canada.
And for those of you who might not recognize the reference, it's from Jen's book:

01 Mar 00:46


2 Quick Ways to Add a Sunflare in Photoshop
by Lily Sawyer
Sunflares can make an otherwise dull image, look pretty dramatic. It’s very tricky to get good images of a sunflare in-camera, especially when using natural light only, as the contrast between the light and dark parts of the image is often too great that no amount of Active-D lighting can fix. Thankfully, we have Photoshop and many special effects like sunflares can be magically created, added, or enhanced, using this software’s mind-blowing functionality.
Why add a sunflare?
Special effects, such as a sunflare, ultimately boil down to the photographer’s personal taste. Here are a few reasons why sunflares may be added in post-processing.
- To exaggerate the sun’s rays.
- To enhance contrast and inject drama.
- To hide unwanted clutter.
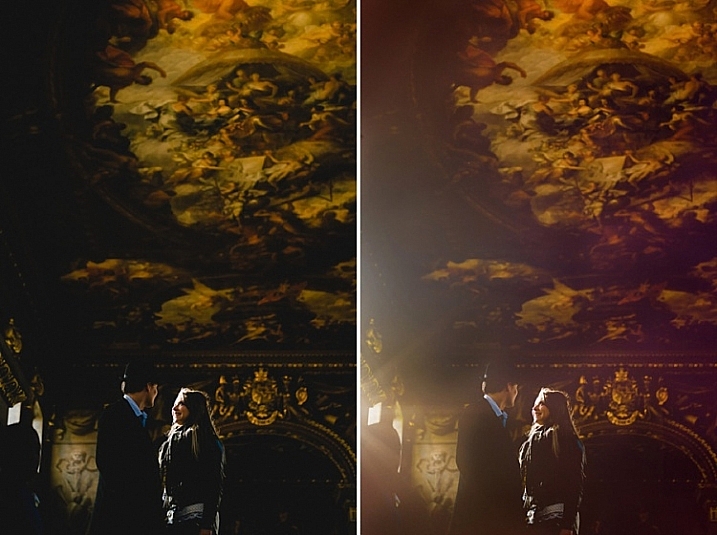
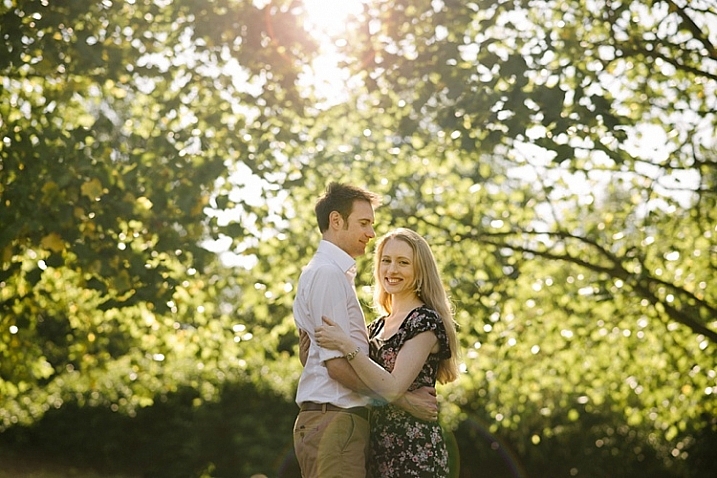
- To achieve artistic effects, for example if you are aiming for a dreamy and romantic effect, or soft and hazy ambience, such as the image above right.
When not to add a sunflare?
When you discover the magic of Photoshop, you can easily get carried away by the excitement of adding special effects, and there’s the danger that you add it on all your images, even when completely out of context, out of place, or totally unnecessary. I suggest avoiding sunflares when:
- There is no sun at all or any large light source, in the shot.
- When it makes the image look completely fake, when you really mean for it to look natural.
How to add flare in Photoshop
As is the usual case in Photoshop, there are always several methods to do something. This tutorial focuses on two ways of adding a sunflare.
1. Method one: Using the LensFlare filter
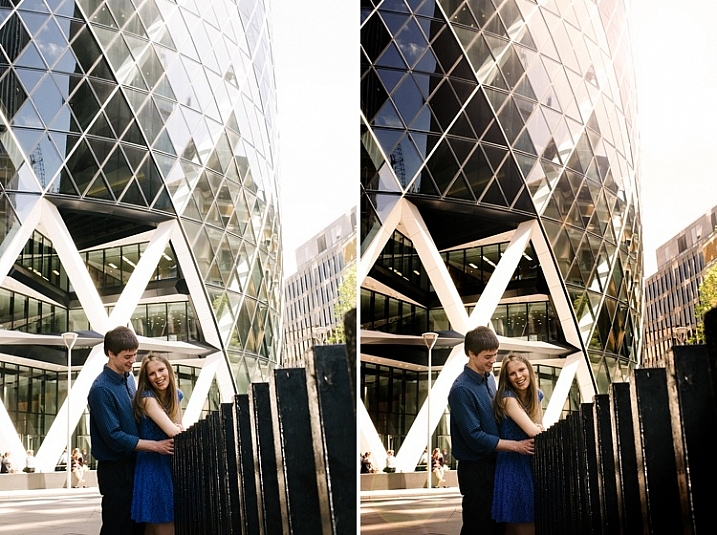
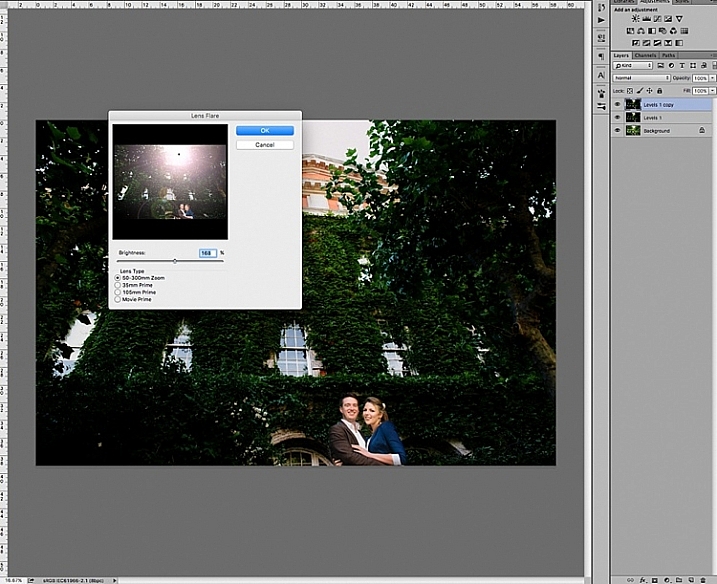
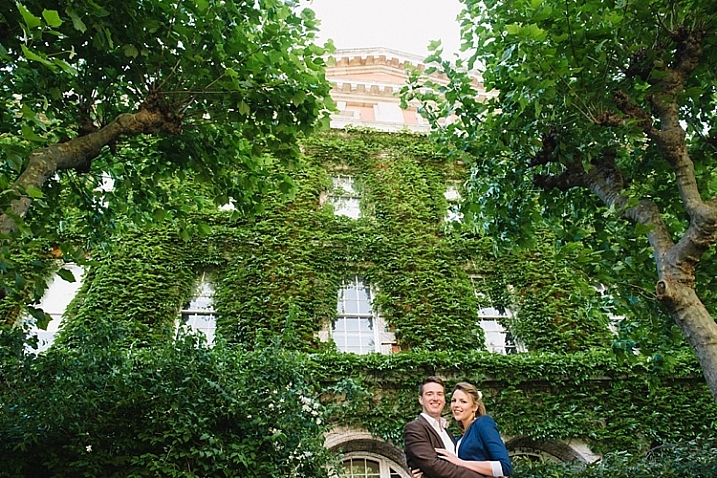
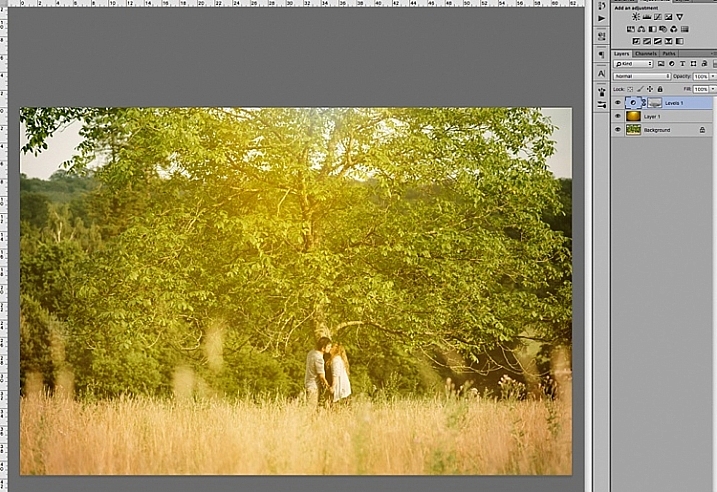
Adding a bright sunflare to the image above won’t make much difference to an already washed out sky and part of the building. First of all you would need to create contrast by darkening the image. Copy the image on a new layer using CMD/CNTRL + J, and darken it using a Levels adjustment layer.
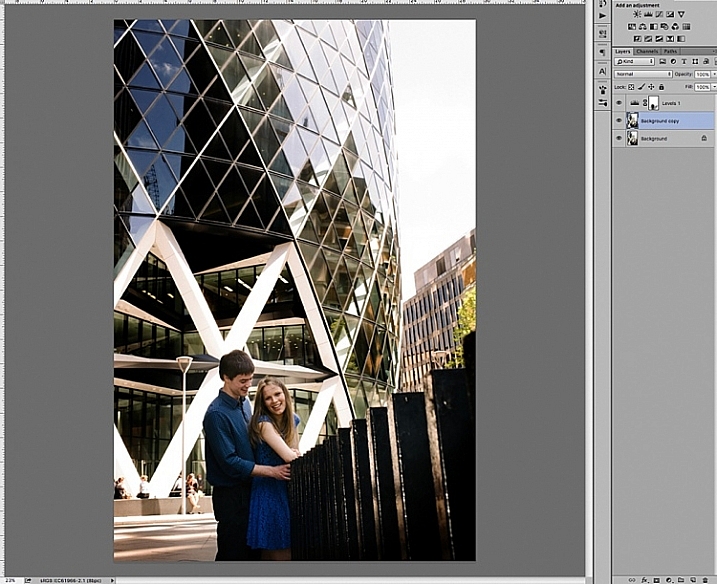
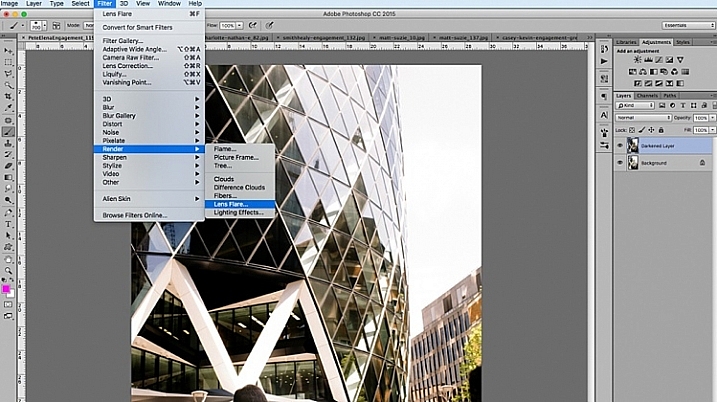
Merge the background copy layer with the levels layer, by selecting both layers and typing CMD/CNTRL + E to merge them. Now you have a new darkened layer. Make another copy of the new darkened layer, then work on this new layer with the sunflare.
When you add sunflare, it is automatically added on the layer as part of the image, and not on a new layer by itself. So to be safe, keep a copy of the darkened layer which you don’t touch. Always work on the new copy with the sunflare, so in case you make mistakes or need to reposition your sunflare, then you won’t need make a darkened layer all over again. You can just delete the layer you are working on, and duplicate your untouched dark layer, to start adding a new sunflare.
In Photoshop, bring up the Lens Flare from the top menu bar using the Filter>Render>LensFlare drop down menu.
You can experiment which type of lens flare you want to add, by clicking the circles next to the type of sunflare option, and adjusting the brightness intensity by moving the slider. Click OK when you’re happy with your choice, and the sunflare will be superimposed on your image on the same layer.
Once the sunflare is applied to the image, add a layer mask, and using a soft black brush, remove some of the sunflare from areas you want to protect such as faces (make sure to paint on the mask, not on the layer).
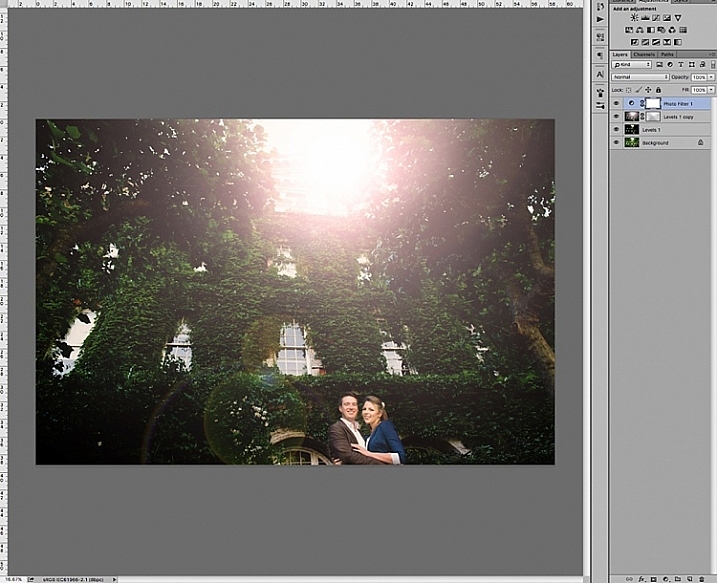

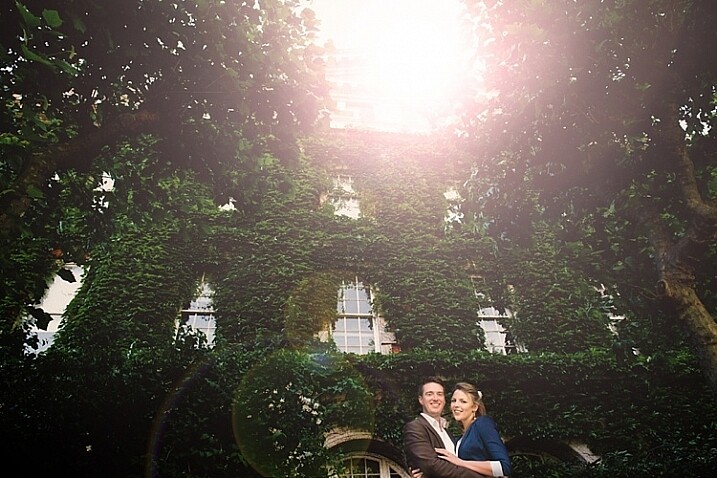
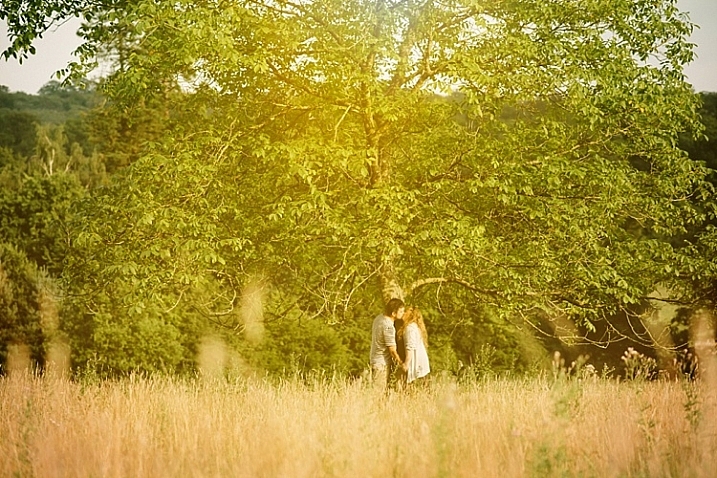
To finish, I added a photo filter on top, to warm up the image. Below is the image before and after the sunflare has been added. It is always a good practice to save the image with sunflare as a new JPG file, and always save your Photoshop file (PSD) with all the layers in tact, in case you need to revisit it again in the future.
2. Method two: Using overlays
The built-in sunflares in Photoshop have very limited choices, as you have seen above. There are far more interesting sunflares of all shapes and colours available, in the form of overlays.
Below is an example of an image with a faint sunflare added in Photoshop, using one of the built-in choices above. I don’t think this is dramatic enough. In this example, I am exaggerating the sunflare by adding a sunflare overlay.
First darken the image with Levels, as in the first method above, using a layer mask to protect areas you don’t want to be darkened. Then apply the overlay on the entire image, as shown below.

Change the layer blend mode to Screen, which makes all the dark areas of the overlay disappear, and you will only be left with the light areas superimposed on your image.
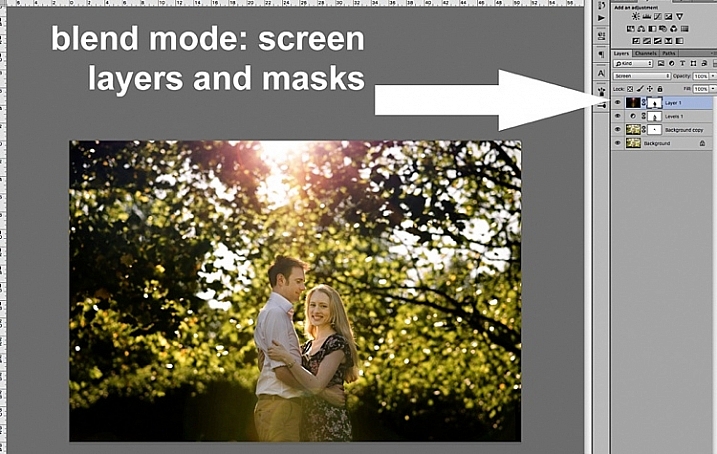
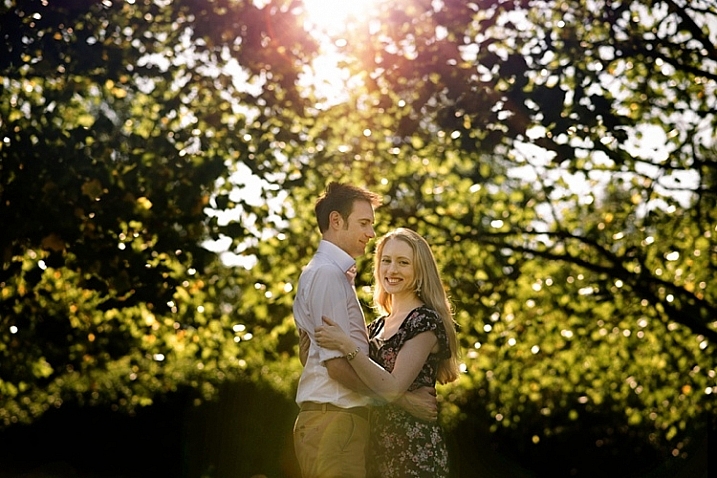
Below is the final JPG image with the new sunflare overlay, with the whole image darkened for more contrast.
Below is another image about to be treated with a sunflare overlay, but this time way more exaggerated than the example above.
The overlay is so strong, as you can see on Layer 1 below, I have applied a levels layer to brighten it a little, and a layer mask to gradually remove some of the overlay from areas I wanted to protect.
Below is the final image with an exaggerated sunflare overlay, that looks like it has been photographed through a warm filter over the lens.
A few things to note when applying special effects
- Be subtle and experiment with the opacity to achieve the desired effect.
- Darken surrounding areas to emphasize flare, especially on a very bright image.
- Mask off special effects from faces, and areas that clearly do not need it. The built-in sunflares in Photoshop have circular flares that appear too perfect and hard-edged. You can always mask some of this away to take the edge off, and soften the flare effect.
I hope you have enjoyed this little tutorial in adding a sunflare special effect in Photoshop. Do you have other tips and ways to add sunflares in post-processing? Please share them in the comments below.
The post 2 Quick Ways to Add a Sunflare in Photoshop by Lily Sawyer appeared first on Digital Photography School.
01 Mar 00:26
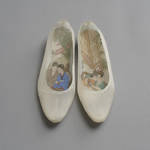
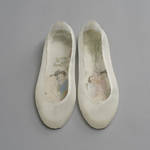
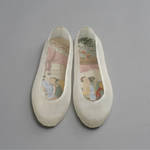
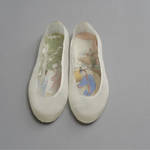
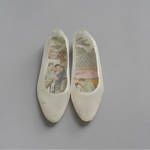
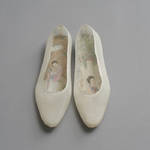

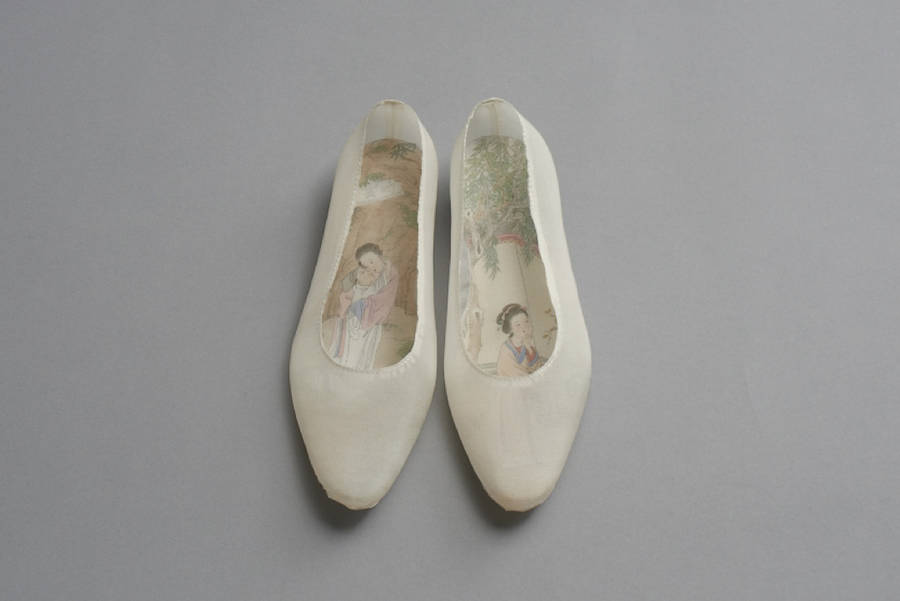
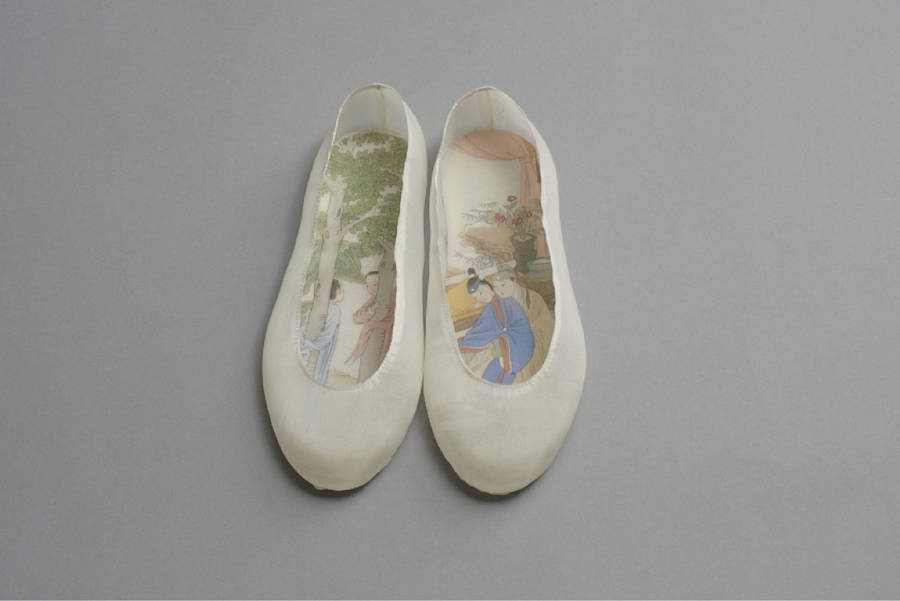
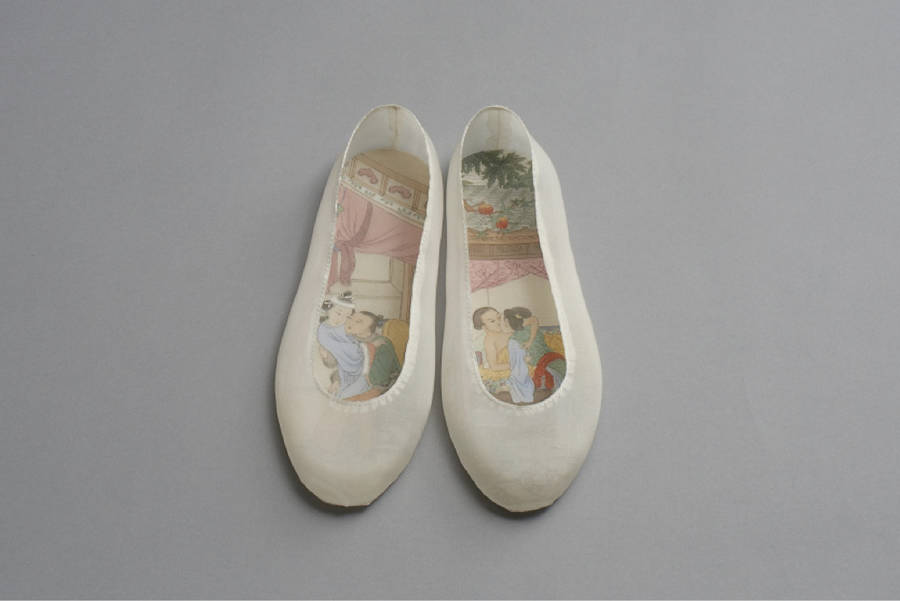
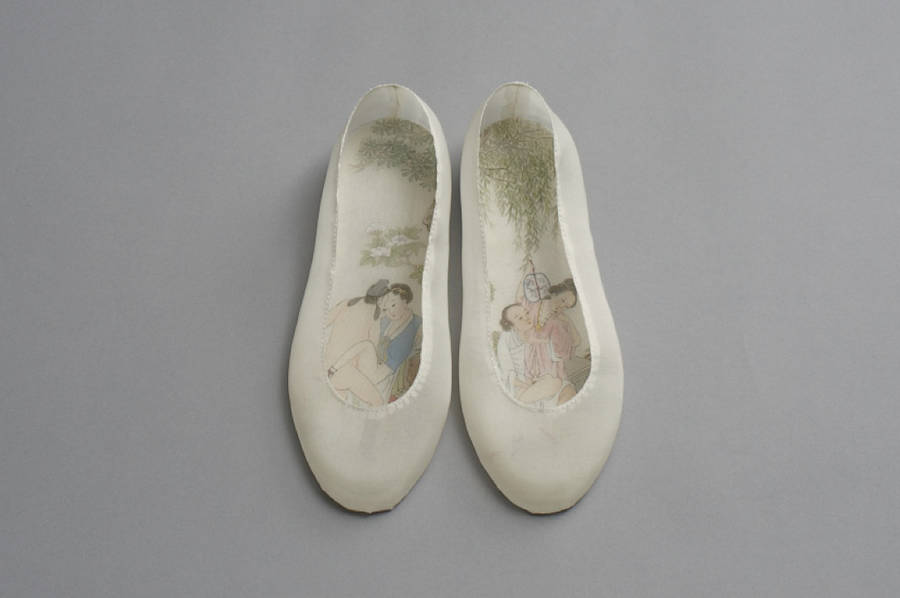
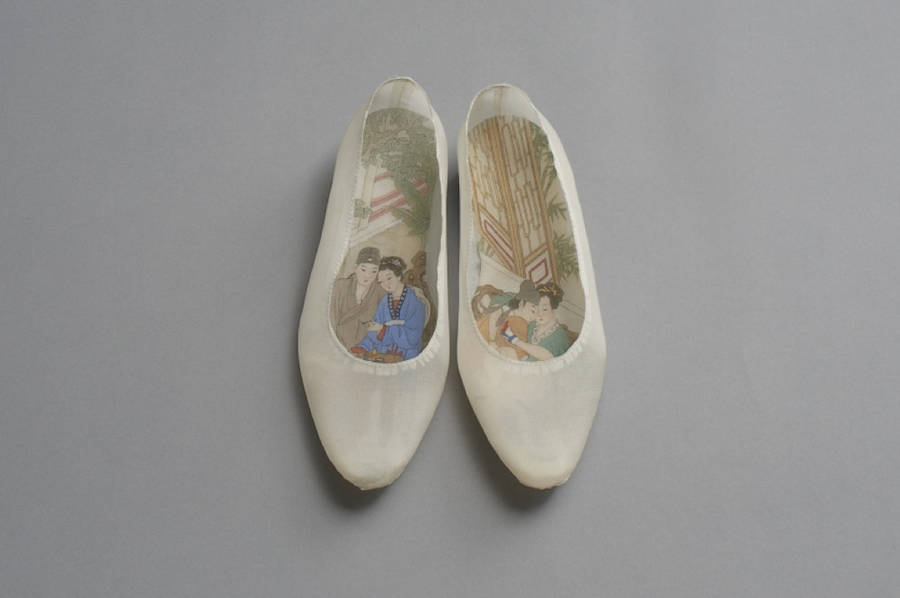
Traditional Chinese-Style Illustrations in Silk Shoes
by Léa
L’artiste chinoise Peng Wei imagine de sublimes illustrations inspirées des peintures traditionnelles chinoises. Elle réalise ses oeuvres au sein de petits chaussons de soie. L’illustratrice rend hommage à la féminité au travers de créations subversives qui mêlent l’art traditionnel à la société moderne.

Psychosako likes this
24 Apr 03:50
THE REAL
PsychosakoMore like the Mandarin...
06 Apr 03:56
Next Time Knock When Elmo and Cookie Monster Are Looking for Privacy
Psychosako likes this
02 Apr 07:45


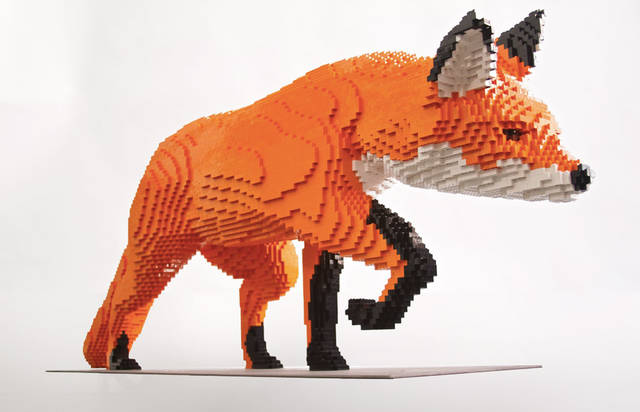
Lego Sculptures Inspired by the Natural World
by Valentin
Depuis plus de 10 ans, l’artiste Sean Kenney réalise d’immenses sculptures à l’aide de LEGO. Son œuvre la plus récente est en vedette dans son exposition itinérante « Nature Connects » qui comprend 27 sculptures inspirées par la nature. Chaque réalisation demande un nombre vertigineux de pièces et d’heures de travail. Par exemple, le bison à taille réelle aura nécessité 45 143 pièces et 700 heures de travail.


Psychosako likes this
25 Mar 17:45

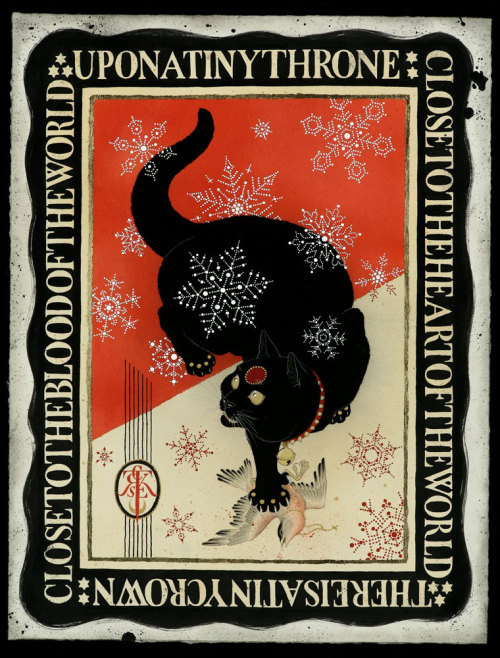
Horror Related Characters
by Donnia
Psychosakothe smallest details communicate the biggest ideas.
La graphiste portugaise Sofia Ayuso a fait une série d’illustrations de personnages issus de célèbres thrillers et films d’horreur. Horror Related Characters présente des portraits réalisés avec des lignes noires, sous formes d’icônes sans visage. A vous de deviner les noms qui correspondent à chaque buste.
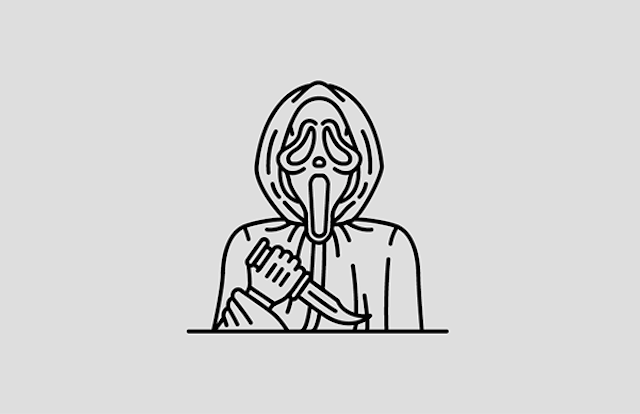


Characters : The Addams Family, Dracula, Frankenstein, Wicked Witch of the West, Billy The Puppet from Saw, Edward Scissor Hands, Death, Freddie Krueger, Samara from The Ring, Chucky, Zombie, Mummy, Michel Myers, Sweeney Todd, Patrick Bateman from American Pyscho, Dark Knight’s Joker, Red Queen, Ghostface, Hannibal Lecter and the twins from The Shining.


A. Kachmar likes this
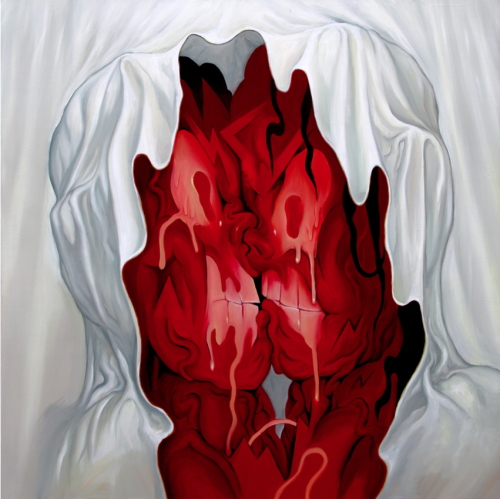
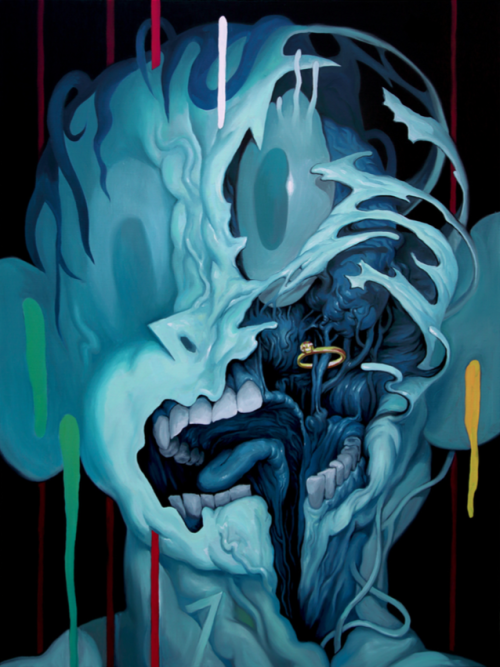
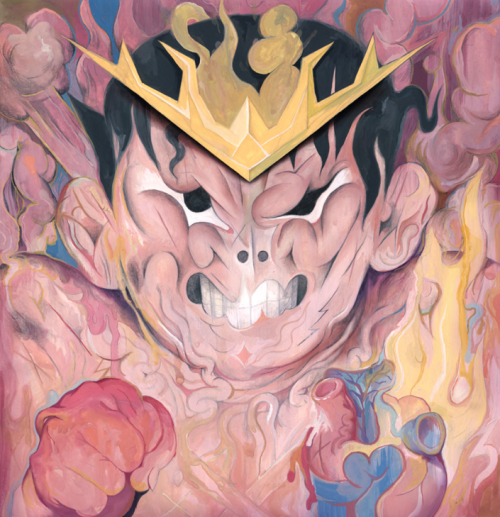
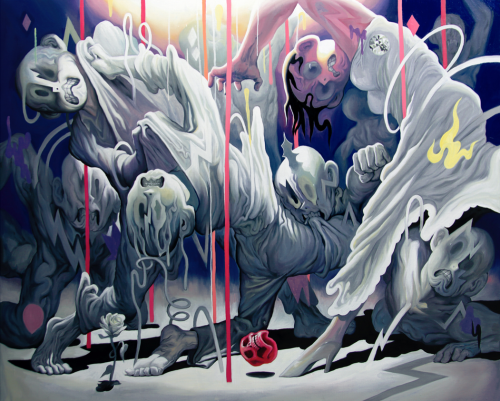
25 Mar 17:40
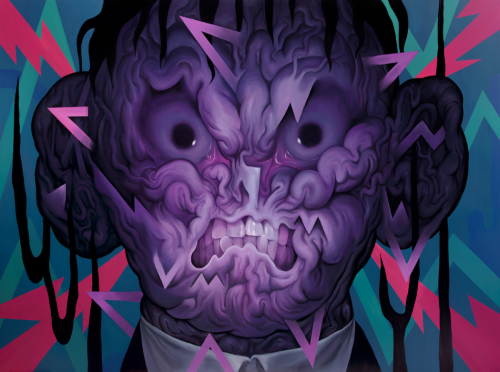
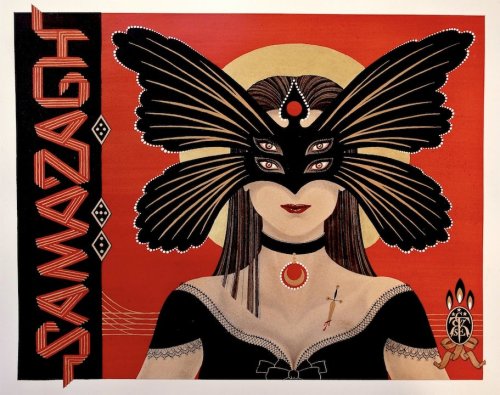
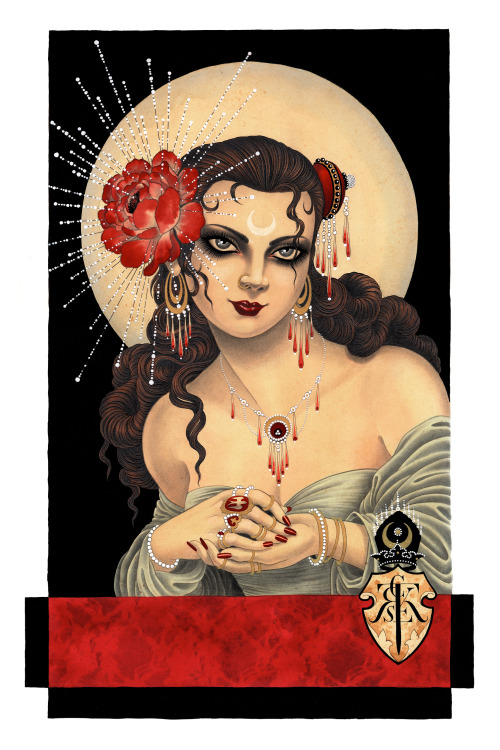
EXCLUSIVE: Lee Hongmin. I’m super excited to introduce you all...
PsychosakoVisceral Cartoons
I’m super excited to introduce you all to the work of South Korean artist Lee Hongmin. The vibrant, action packed and beautiful work is being shown for the first time here on Supersonic and I’m certain I’ll be showing more and more work from him over the years. Looking forward to it.
Continue below to see more of the fascinating work by Lee:
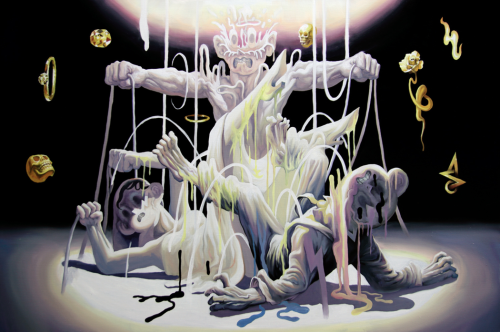

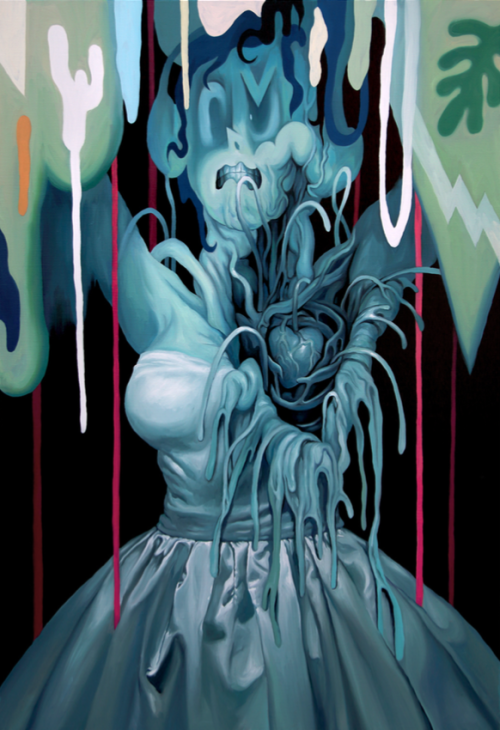
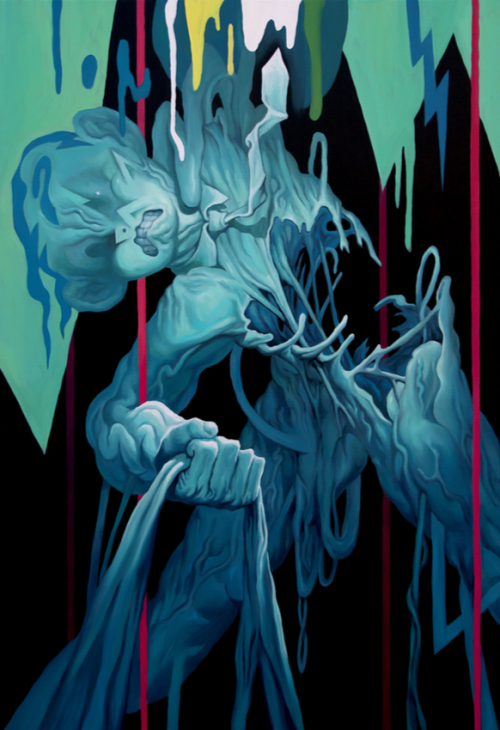
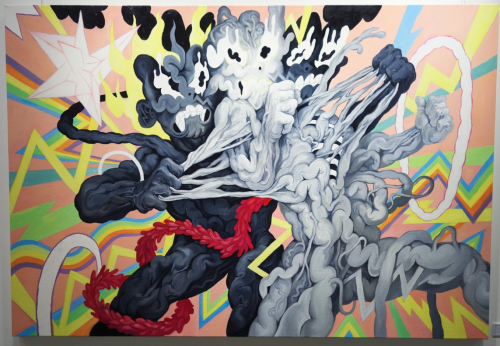
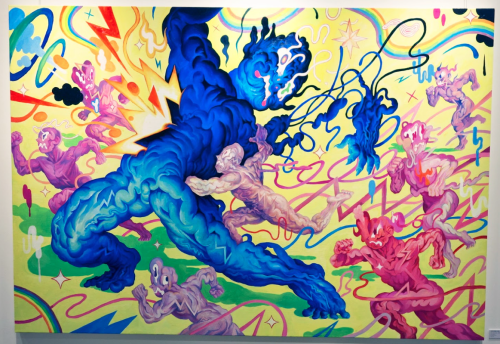
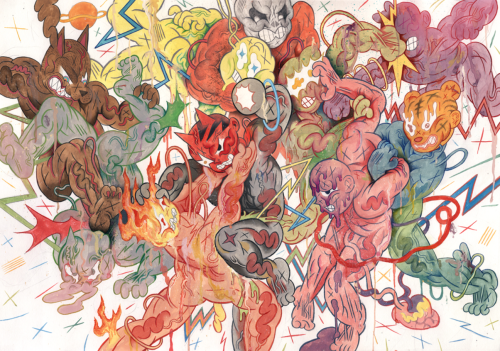
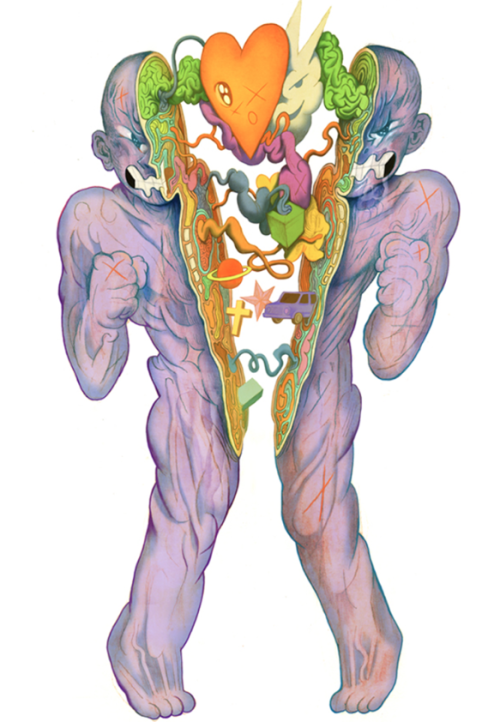
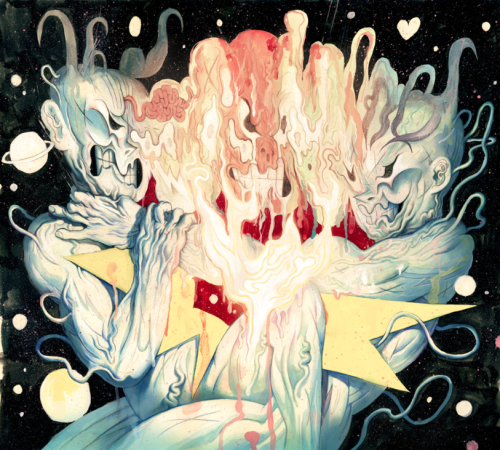
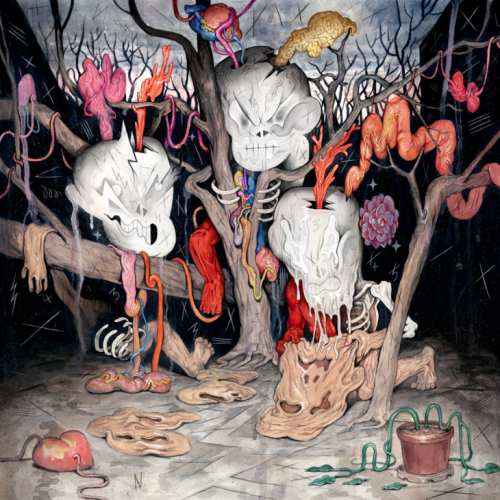
Lee Hongmin: Website
13 Oct 13:05
The Founding Fathers Can't Even With Our BS
Psychosako likes this
12 Aug 21:50
LA is About as Arduous as the Oregon Trail Anyway
Psychosako likes this
12 Aug 21:43


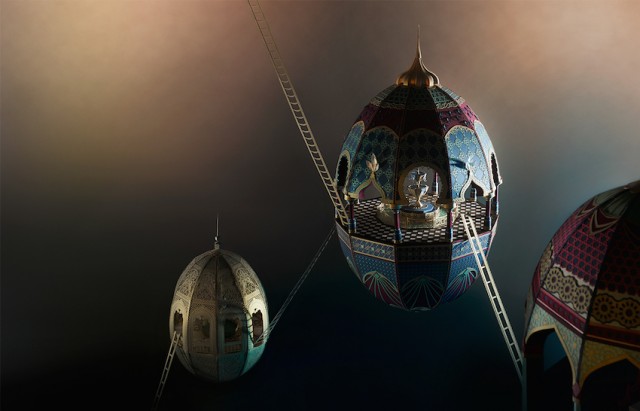
Cloud City
by Baptiste
Fruit de la collaboration entre le studio new-yorkais The Makerie Studio et le photographe Luke Kirwan, Cloud City est un projet d’une beauté incroyable s’inspirant de l’architecture et des motifs de la culture marocaine pour créer des structures en papier absolument magnifiques, semblant flotter parmi les nuages. Un travail d’une grande poésie à découvrir en images dans la suite.


Davidbrawley, Felipe Frazão and one other like this
12 Aug 21:42
 This is a small series (there's three) of Volkswagen ads designed by Costa Rican art director Fabio Obando featuring drunk superheroes who have gotten into car accidents. The tagline reads 'Don't let your ego drive you. If you drink don't drive.' It's a valid message. Although why the hell Superman was driving in the first place is beyond me. You ever gotten so drunk before you forgot you could fly? That is TRASHED. I bet his blood alcohol content is 200%. Don't drink and drive, folks.
Keep going for Superman and The Hulk.
This is a small series (there's three) of Volkswagen ads designed by Costa Rican art director Fabio Obando featuring drunk superheroes who have gotten into car accidents. The tagline reads 'Don't let your ego drive you. If you drink don't drive.' It's a valid message. Although why the hell Superman was driving in the first place is beyond me. You ever gotten so drunk before you forgot you could fly? That is TRASHED. I bet his blood alcohol content is 200%. Don't drink and drive, folks.
Keep going for Superman and The Hulk.
 Thanks to lebeeps, who agrees another valid option is trying to find a safe place to hide and sleep. PROTIP: Always look to see if the bar has an attic.
Drunk Superhero Anti-Drunk Driving Volkswagen Ads
This is a small series (there's three) of Volkswagen ads designed by Costa Rican art director Fabio Obando featuring drunk superheroes who have gotten into car accidents. The tagline reads 'Don't let your ego drive you. If you drink don't drive.' It's a valid message. Although why the hell Superman was driving in the first place is beyond me. You ever gotten so drunk before you forgot you could fly? That is TRASHED. I bet his blood alcohol content is 200%. Don't drink and drive, folks.
Keep going for Superman and The Hulk.
Thanks to lebeeps, who agrees another valid option is trying to find a safe place to hide and sleep. PROTIP: Always look to see if the bar has an attic.
Psychosako likes this
12 Aug 21:22

New Animals Drawn with Moiré Patterns by Andrea Minini
by Christopher Jobson


Milan-based designer Andrea Minini (previously) recently completed a new series of animals illustrated with textured moiré patterns, creating an usual intersection between natural forms and mathematics. It’s curious to see how the patterns give each illustration a great sense of motion, curving naturally with the shape of each animal. If you’re interested, many of these are available as prints over in the My Modern Shop. (via Neatorama)
Sthevens, Psychosako likes this
12 Aug 21:17


This Death Star of a Speaker Actually Floats in Midair
by Adam Clark Estes
Bluetooth speakers are ubiquitous these days, so it's no surprise to see some companies going out on a limb to set themselves apart. OM Audio, however, is venturing beyond that limb into thin air with its new OM/One floating speaker. Not only is levitation a neat gimmick, but it supposedly also helps the sound travel better. Even if it doesn't, at least it looks cool.
CyUzi, Psychosako likes this
12 Aug 21:14
Paintings by Christopher Conn Askew. Enticing paintings by...
Paintings by Christopher Conn Askew.
Enticing paintings by Christopher Conn Askew who also uses the moniker “SekretCity” as these images are from the city that exists inside of him. See more of his work below:
Christopher Conn Askew: Website
Randy Laue, ThePrettiestOne and 2 others like this
12 Aug 21:01


Marvellous Illustrations by Mark McHaley
by PauloGabriel
Pop culture is one of the greatest subjects for artists. It's just great to see an amazing illustration of Star Wars, Superman or Indiana Jones, and some artists out there really enjoy doing what some might call a fanservice.
Here you can see some of these fanservice pieces done by American artist Mark McHaley. These are only a handful of his work. For more of it, please visit his portfolio at DeviantART! He'll definitely enjoy your views. I hope you enjoy these! Cheers. ;)


Tags:
Brought to you by:
Stjepan, Psychosako likes this
17 Jul 02:02
The Weather Can't Be Nice All The Time
Psychosako likes this
02 Jul 08:46


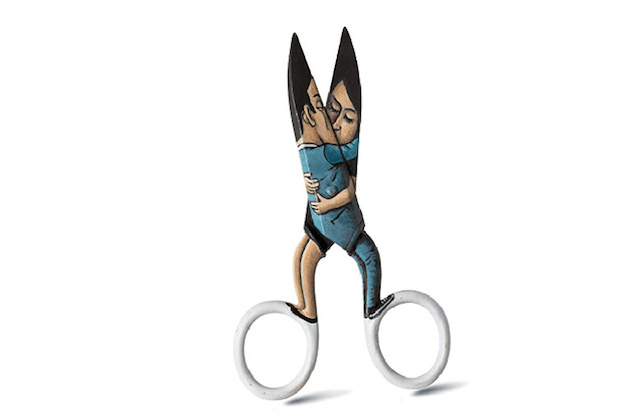
Everyday Objects Turned Into Playful Characters
by Donnia
L’artiste français Gilbert Legrand crée des petits personnages très marrants à partir d’objets du quotidien : des ciseaux, des pinceaux, des tire-bouchons et des robinets se transforment en couple d’amoureux, serveur, fillette et renards. Une belle manière de donner vie à des objets inanimés.


Cary Renquist, Tertiarymatt and one other like this
01 Jul 01:06


A 20-Sided Pocket Art Director Gives You Free Design Advice
by Jordan Kushins
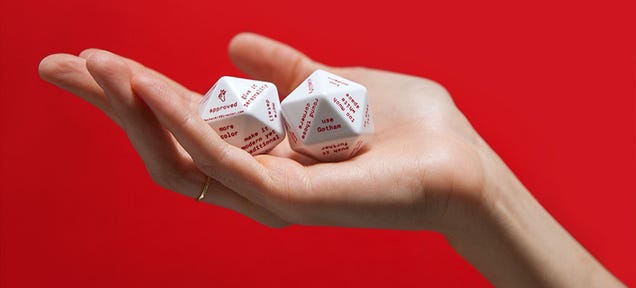
When deadlines are a-looming and your creative well has momentarily run dry; when a conversation with colleagues would result in a down-the-rabbit-hole discussion that time won't allow; or when a client wants a design change and you need guidance from an impartial third party; the Pocket Art Director wants to help you with your work. In other words: "Just get it done."
Psychosako likes this
30 Jun 01:41


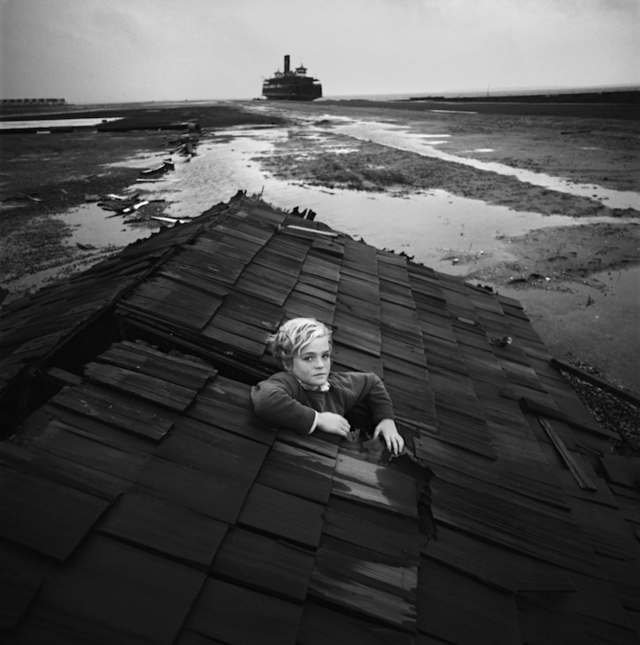
Arthur Tress Strange Photography
by Baptiste
Dans les années 1960-1970s, le photographe américain Arthur Tress s’est intéressé au monde des rêves et des cauchemars avec ses clichés et notamment avec la série « Theater of the Mind », dans laquelle il s’amuse à illustrer et mettre en scène les rêves d’enfants ainsi que ceux d’adultes, proposant ainsi des images en noir & blanc étranges et d’une grande qualité.


Cary Renquist, Psychosako likes this