In this tutorial, you'll learn how to use a jQuery plugin to add simple form validation to your website.
Using a jQuery plugin to validate forms serves a lot of purposes. It gives you additional abilities like easily displaying custom error messages and adding conditional logic to jQuery form validation. A validation library can also help you add validation to your HTML forms with minimal or no changes to the markup. The conditions for validity can also be added, removed, or modified at any time with ease.
Getting Started
We'll use the jQuery Validation Plugin in this tutorial. The plugin offers a lot of features and also helps you define your own validation logic.
Before we can start using the plugin in our fields, we have to include the necessary files in our project. There are two different files to include. The first is the core file, which includes the core features of the plugin, including everything from different validation methods to some custom selectors. The second file contains additional methods to validate inputs like credit card numbers and US-based phone numbers.
You can add these files to your projects via package managers like Bower or NPM. You can also just directly get a CDN link to the files and add them to a script tag on your webpage. Since this is a jQuery-based plugin, you'll also need to add a link to the jQuery library.
Once you've added these files, you can start validating any form with the validate method.
Validating Your First Form
You can start using this plugin without making any significant changes to your markup. The only thing that you might have to change is to add an id or class to the form you want to validate if it doesn't have one already.
Here is the markup of a basic form that we'll be validating using the jQuery validate plugin.
We are using the same attributes that we used in our previous HTML5-based form validation tutorial. The form will still do the validation without us adding any JavaScript. However, using the plugin for validation will let us show the error messages right below the invalid input field. We'll also be able to style the errors however we want.
To start validating the form with this plugin, simply add the following JavaScript code on the webpage:
This is based on the assumption that you've already added the required JavaScript files. Adding those lines of JavaScript will make sure that your form is properly validated and shows all the error messages. Here is a working demo.
The library tries to be as user-friendly as possible by only showing error messages when they're necessary. For example, if you tab through the name and email fields without actually entering any information, you won't get any error messages. However, if you try to move to the email field after only entering one character in the name field, you'll get an error message about entering at least three characters.
The error messages are injected into the DOM using the label element. All of them have an error class, so it's easy to apply your own styling, as we did in our example. The same is true for invalid inputs, which also get an error class added to them.
Options for the validate() Method
In our previous example, we simply called the validate() method without passing any options to it. However, we can also pass an object to this method along with many options inside that object. The value of these options will determine how the form plugin handles validation, errors, etc.
If you want this plugin to ignore some elements during the validation process, you can do so easily by passing a class or selector to ignore(). The plugin will ignore all form elements with that particular selector when it validates the input.
Add Validation Rules for Input Fields
You can also pass some rules to the validate() method in order to determine how the input values are validated. The value of the rules parameter should be an object with key-value pairs. The key in each case is the name of the element that we want to validate. The value of that key is an object which contains a set of rules which will be used for validation.
You can also add conditional logic to the different fields that you're validating by using the depends keyword and passing a callback function to it which returns either true or false. Here is an example which uses simple rules to define how the input is validated.
In the above code snippet, the keys name, age, email and weight are simply the names of input elements. Each key has an object as its value, and the key-value pairs in the object determine how an input field will be validated.
These validation options are similar to the attributes that you can add in the markup of a form. For example, setting required to true will make the element required for form submission. Setting minlength to a value like 3 will force users to enter at least 3 characters in the text input. There are a few other built-in validation methods which are briefly described on the documentation page.
One thing that you should note in the above code is the use of depends to conditionally make the weight a required field if the age is over 50. This is done by returning true in the callback function if the value entered in the age input field is over 50.
Create Your Own Error Messages
This plugin also allows you to set error messages for different validation rules in a form. You begin by setting the value of the messages key to an object with key-value pairs for the input fields and the corresponding error messages.
Here is an example which will display custom error messages for each input field.
messages : {
name: {
minlength: "Name should be at least 3 characters"
},
age: {
required: "Please enter your age",
number: "Please enter your age as a numerical value",
min: "You must be at least 18 years old"
},
email: {
email: "The email should be in the format: abc@domain.tld"
},
weight: {
required: "People with age over 50 have to enter their weight",
number: "Please enter your weight as a numerical value"
}
}
Just like rules, messages rely on the name of the input fields. Each of these input fields will accept an object with key-value pairs as its value. The key in each case is the validation rule which has to be followed. The value is simply the error message that you want to display if a particular rule is violated.
For instance, the age input field will trigger the required error message if left blank. However, it will trigger the number error if you enter anything else besides a number in the input field.
One thing you'll notice is that the plugin will show a generic error message for validation rules where you haven't supplied a custom error message. Try filling out different values in the following demo, and you'll see that the custom and generic error messages show up as expected.
Customizing the Appearance of Error Messages
There are times when you might want to add your own classes to valid and invalid input in order to target them more specifically or for better integration with an existing theme.
You can change the classes which are added to valid or invalid input elements using the errorClass and validClass keys. This can help prevent some unwanted clashes due to reusing the same class name. By default, the error class is assigned to every invalid input element and label. The valid class is assigned to every valid input element.
It's important to remember that setting errorClass to something like fail-alert will remove the error class from the invalid elements. You'll have to use errorClass: "error fail-alert" to assign multiple classes to the same element. The same goes for validClass.
There are no additional labels added to the form when users enter a valid input. So the classes from validClass are assigned to the valid input element.
The following code snippet builds upon the previous example to add custom CSS classes and styling to invalid and valid elements.
The only additional JavaScript code is used to assign the classes.
$(document).ready(function() {
$("#basic-form").validate({
errorClass: "error fail-alert",
validClass: "valid success-alert",
// ... More validation code from previous example
Here is the CSS that we'll use to change the appearance of error messages:
In addition to customizing the error messages, we are also adding our own styling to valid input elements. Here is a CodePen demo to show us the final result.
More Options to Change the Plugin Behavior
You can prevent the plugin from validating input fields on key up, click, and other such events by setting the value of onfocusout, onkeyup, or onclick to false. Keep in mind that boolean true is not a valid value for these keys. This basically means that if you want the plugin to validate or lose focus on a key up event, just leave these options untouched.
You also have the option to change the element in which the error appears. By default, the plugin uses the label element to show all error messages, but you can change it to em or any other element using the errorElement key. The error element itself can then be wrapped in another HTML element using the wrapper key.
These are some of the most common options that you're likely to use when validating forms. However, there are some other validation options that might come in handy if you want to do something like changing the placement of error messages or grouping them all together.
jQuery Form Validation, JavaScript, and jQuery Forms Found on CodeCanyon
Learning how to do simple form validation by yourself is a great skill to have. But you can get even deeper with these useful jQuery and JavaScript form downloads from CodeCanyon:
If you want to build a multi-step form, the Timon Step Form download is right for you. It features multiple form elements and transition effects that you can use to customize your work. Timon also has a drag-and-drop builder, meaning you can build your form without needing any coding knowledge. It also has jQuery form validation.
Smart Forms is a fully featured framework for creating simple and complex forms. It has Google reCAPTCHA support, international phone number validation, and much more. With the simple form validation in jQuery code, Smart Forms is a great choice to check out.
Reading the name of this purchase will let you know exactly what you're getting here. But there's more to these forms than meets the eye. The more than 110 included forms are ready for use, or you can use the framework to make a unique form for yourself.
Forms Plus is one of the top JavaScript forms found on CodeCanyon. There are more than 100 templates that you can choose from. Forms Plus also has features like:
We round out our list with the highly customizable Sky Forms. It comes with modern elements and multiple color schemes. There are also six designed states, including hover, focus, and more. On top of these features and the cross-browser compatibility, there are over 300 vector icons in Sky Forms.
Final Thoughts
In this tutorial, we learned how to take our form validation to the next level using a jQuery plugin. Using simple JavaScript form validation gives us a lot of additional control over basic HTML validation. For instance, you can easily control how and when different error messages appear when an input is filled with invalid values.
Similarly, you can also specify if the plugin should skip validation for some particular elements. I'd strongly recommend that you read the documentation of this plugin and some best practices on how to use it properly.
In our next tutorial, you'll learn about some more JavaScript-based tools and plugins to help you easily create and validate forms.
And while you're here, check out some of our other posts on JavaScript forms and form validation!
One of the big reasons to use jQuery, for a long time, was how easy it made Ajax. It has a super clean, flexible, and cross-browser compatible API for all the Ajax methods. jQuery is still mega popular, but it's becoming more and more common to ditch it, especially as older browser share drops and new browsers have a lot of powerful stuff we used to learn on jQuery for. Even just querySelectorAll is often cited as a reason to lose the jQuery dependency.
How's Ajax doing?
Let's say we needed to do a GET request to get some HTML from a URL endpoint. We aren't going to do any error handling to keep this brief.
jQuery would have been like this:
$.ajax({
  type: "GET",
  url: "/url/endpoint/",
}).done(function(data) {
  // We got the `data`!
});
If we wanted to ditch the jQuery and go with browser-native Ajax, we could do it like this:
var httpRequest = new XMLHttpRequest();
httpRequest.onreadystatechange = ajaxDone;
httpRequest.open('GET', '/url/endpoint/');
httpRequest.send();

function ajaxDone() {
  if (httpRequest.readyState === XMLHttpRequest.DONE) {
    if (httpRequest.status === 200) {
      // We got the `httpRequest.responseText`!
    }
  }
}
The browser support for this is kinda complicated. The basics work as far back as IE 7, but IE 10 is when it really got solid. If you wanna get more robust, but still skip any dependencies, you can even use a window.ActiveXObject fallback and get down to IE 6.
Long story short, it's certainly possible to do Ajax without any dependencies and get pretty deep browser support. Remember jQuery is just JavaScript, so you can always just do whatever it does under the hood.
But there is another thing jQuery has been doing for quite a while with it's Ajax: it's Promise based. One of the many cool things about Promises, especially when combined with a "asynchronous" even like Ajax, is that it allows you to run multiple requests in parallel, which is aces for performance.
The native Ajax stuff I just posted isn't Promise-based.
If you want a strong and convenient Promise-based Ajax API, with fairly decent cross-browser support (down to IE 8), you could consider Axios. Yes, it's a dependency just like jQuery, it's just hyper-focused on Ajax, 11.8 KB before GZip, and doesn't have any dependencies of its own.
With Axios, the code would look like:
axios({
  method: 'GET',
  url: '/url/endpoint/'
}).then(function(response) {
  // We got the `response.data`!
});
Notice the then statement, which means we're back in the Promise land. Tiny side note, apparently the requests don't look identical to jQuery on the server side.
Browsers aren't done with us yet though! There is a fairly new Fetch API that does Promise-based Ajax with a nice and clean syntax:
fetch('/url/endpoint/')
  .then(function(response) {
    return response.text();
  })
  .then(function(text) {
    // We got the `text`!
  });
The browser support for this is getting pretty good too! It's shipping in all stable desktop browsers, including Edge. The danger zone is no IE support at all and only iOS 10.1+.
Por defecto, si no haces nada, WordPress se actualizará automáticamente a todas las nuevas versiones menores, de mantenimiento y seguridad, algo totalmente fiable y seguro, pero quizás haya ocasiones o instalaciones en que no desees este comportamiento por defecto.
Afortunadamente se pueden desactivar fácilmente y volver a tener absolutamente todo el control sobre qué actualizar y qué no en WordPress. Solo tienes que añadir esta línea a tu fichero de configuración de WordPress (wp-config.php):
define( 'WP_AUTO_UPDATE_CORE', false );
Una vez guardes los cambios WordPress no volverá a actualizarse automáticamente por su cuenta, requerirá tu intervención para las actualizaciones, para todas, las menores y las mayores.
The following is a guest post by Shankar Cabus. Shankar made a really rad color wheel on CodePen and showed it to me. I thought it was an image underneath, because gradients like this aren't something CSS can natively do. Or so I thought. Shankar found a way to do it with newfangled tech.
When I create filters, shadows, transformations or gradient backgrounds in CSS, it feels amazing. Who would have thought CSS would come this far. No need to use images for any of that stuff. I can almost hear the browser telling me "don't worry, I do it for you."
Despite all this evolution, CSS still has limitations. For instance, background gradients can only be created in linear or radial styles, but not a conical shape.
In 2011, Lea Verou started a thread about implementing a native CSS conical gradient, creating a draft specification which has already been introduced to W3C's official draft. However, we still have to wait for the W3C to formalize the feature and for the browsers to implement it, which might still take quite some time. In the meantime, I will show you how to simulate a conical gradient using CSS3 only.
Example of a conical gradient.
Beautiful, right? Let's look at the code!
The Beginning
To reduce code duplication, I'm using Sass. One of the most interesting features of CSS preprocessors is the @mixin. A @mixin is a blend of function and include which, when called, returns its contents.
This @mixin is only used to set properties of shape and placement, creating a circle of absolute position and centered horizontally and vertically in relation to its parent.
The Magic!
By combining a @mixin circle with the clip property, we can get a semi-circle. Let's start by creating a full circle by placing two semi-circles (with different colors) together. Can you imagine what is going to happen if we rotate one of the semi-circles? Magic!
The clip: rect (top, right, bottom, left) property restricts the visible area to a rectangular element, which causes only half of the red circle to be seen in the example above. The same principle is applied to the blue circle, the .color:after element. At this point we would have a full circle which is half red and half blue. However, the transform property causes the blue circle's visible area to invade the red circle's. See example.
Semi-circles with clip property
The Colorful Umbrella
Colorful umbrella
We already know how to perform this magic trick. Let's create a 12 color umbrella:
From the seventh item, the .color becomes a semi-circle with the left half of the circle and the .color:after elements pass to the right half of the circle.
We are almost done!! We need to change the colors and the angle of each element. Again, let's abuse the power of Sass to generate 26193^42 lines of code in just over 10 ;)
First, we define the $colors array with the "12 colors of the rainbow" and then iterate over the list creating .color:nth-child(n):after selector with the background-color, rotate and z-index properties.
The rotate property has some important points. Its angle is defined according to the number of colors in the circle. In our case, there are 12 colors, so 360/12 = 30 is the rotation of each color. But from the seventh item on, the other half of the circle starts, remember? Thus, the process we just described stops at the seventh item. We will then start the very same process again, but this time, the rotation will take place on another direction.. That's why there is an @else with rotate(#{-30+(30*($i+1))}deg) which subtracts 30 degrees from the elements of the second half of the circle.
If you are a good observer (and understood everything so far), you should have noticed that our our umbrella is actually a fan! Bazinga! So for the last color of the first half of the circle does not get on top of other colors, we need to reverse the index of these elements. For example, the z-index (6) = 1 and z-index (1) = 6.
A Little More Magic
Finally, we need to ease the transition between colors, after all, we don't want an umbrella-range-rainbow, we want a conical gradient!
The blur filter is responsible for mixing the colors. But, by applying the blur, the colors strain the limits of the circle. That's why the overflow: hidden property was also added to the .wheel element. The inner box-shadow is used to darken the edges that were "washed out". This is the end result:
The conical gradient can be used in different ways to create different effects. But one of the most interesting applications is the Color Picker, as in the example below:
Si tienes en marcha alguna web cuyo tema requiere el uso de imágenes destacadas para la portada seguro que estabas esperando algo así hace tiempo ¿o no?.
Porque cuando un tema requiere designar una imagen destacada y al editor se le olvida, da igual el diseño maravilloso del tema WordPress, el resultado final quedará horrible.
Pues nada, bien fácil, solo tienes que instalar este plugin que, sin configurar nada, requiere que el autor de una entrada defina una imagen destacada para poder publicar, avisándole con un explícito mensaje de error.
Es más, ni siquiera el botón de publicación está activo, para que no haya dudas. Y si lo programas tampoco este botón estará disponible.
Una vez definas una imagen destacada el cambio es automático, de repente desaparece el mensaje de aviso y ya puedes publicar o programar la entrada, así de simple y efectivo.
No hay nada más que activarlo y ya está, si acaso personaliza los mensajes de aviso, que encontrarás en los dos ficheros del plugin, un js y un php. Hay que cambiarlo en ambos porque primero trata de activar la función por JavaScript, y si no va lo hace por PHP. Funciona con entradas, eso si, no con páginas o tipos de entradas personalizadas, tenlo en cuenta.
Cuando entregas una nueva web creada con WordPress son muchas las ocasiones en que dejas preparadas una serie de páginas base, normalmente con la información de la empresa, mapas de ubicación, árbol con el mapa del sitio y esas cosas que suelen pedir los clientes, muchas veces con códigos sensibles que cualquier edición posterior podría echarlos a perder.
¿A que preferirías que nadie sintiese la tentación de modificarlas?
Un modo habitual de evitar que el cliente torpe toque lo que no debe es crearle un perfil mediante el que no pueda modificar ni crear páginas, pero en la mayoría de las ocasiones es una decisión demasiado restrictiva, que no suele gustar a los clientes, así que hay que buscar algo más “controlado“.
Y una solución perfecta es algo tan simple como eliminar de la lista de administración de entradas del escritorio de WordPress aquellas que no queramos que vean y, en consecuencia, modifiquen.
Para ello solo tienes que añadir una función en tu plugin de utilidades, en el que determinarás que ID de páginas no serán visibles, algo así:
//Páginas ocultas de la administración - Elige los IDs de página que no se mostrarán
add_action( 'pre_get_posts' ,'oculta_esta_pagina' );
function oculta_esta_pagina( $query ) {
        if( !is_admin() )
                return $query;
        global $pagenow;
        if( 'edit.php' == $pagenow && ( get_query_var('post_type') && 'page' == get_query_var('post_type') ) )
                $query->set( 'post__not_in', array(8,11,35,66) ); // id de páginas
        return $query;
}
Simplemente cambia los números de ID en el array para que no aparezcan las que tu decidas.
La única pega de este truco es que no evita que se edite la página si el usuario conoce el enlace directo o, simplemente, accede al menú de la barra de WordPress de “Editar página“, pero es un quitamanías bastante eficaz en la mayoría de los casos. Además, que siempre puedes quitar la barra de administración de WordPress.
The act of changing themes on WordPress is a breeze. All you have to do is login to your admin area, go to the themes section and activate the theme you want to use. If you are changing your WordPress theme on a brand new website, that really is all there is to it.
There is much more involved when you are changing themes on a live website. If you simply change the theme that is activated, you will run into a lot of problems. Visitors will be unable to view your website properly until these issues have been resolved. As a rule, you should never make any major modifications to a live website (changing a link or a widget is not too risky).
Changing WordPress themes on a live website is something I tackled recently with the relaunch of one of my websites. You will find that the process of changing design on a live WordPress website is straight forward if you are methodical and ensure that you do not take any risks.
Today I would like to walk you through the key steps you need to follow when changing your WordPress theme on a live website.
1. Backup Everything
Before you do anything, you should make a full backup of your whole website including your database, theme and .htaccess file. You can backup your theme manually using FTP and backup your database using a database manager such as phpMyAdmin.
A more practical solution is to backup your website every day using a backup service such as VaultPress or CodeGuard. Alternatively, you can backup using a good backup plugin such as BackupBuddy. If you do have a daily backup solution setup, make sure you check you have an up-to-date backup before moving onto the next step.
I also encourage you to backup your widgets. This is not as essential as backing up your database and theme, however it can save you a lot of time when configuring your new WordPress theme later. Most people forget to backup their widgets and then need to configure all of their widgets again. This can be a pain; particularly if you use a lot of HTML widgets with custom code and text.
There are a few widget backup plugins on WordPress.org. I personally recommend Widget Importer & Exporter as I like the smooth way it handles widget imports.
Another thing I recommend doing is saving important code snippets in a text file. Some of this information will be backed up automatically when you backup your theme, however by saving this information separately you can quickly transfer the code to your new theme. This will reduce the time your website is offline to visitors.
For example, you could save a copy of:
Your Google Analytics Tracking Code – This may be saved in the options panel of your current theme. If it is not there, you will find it in your theme header or footer template.
Additional Styling – You may have added additional styling to your current theme. You will have a backup of this if it is in your current theme’s style.css file, however it is still worth making a separate copy. Make a point of saving additional styling if it is saved in your theme’s option panel.
Additional Code – Copy any other additional code you may have such as the Facebook app ID code that goes after your opening body tag and any other tracking codes you need to insert.
You can change WordPress themes without backing up your website, however this is something I strongly advise against. If you face any problems during the process of changing themes, you are going to be placed in a very difficult position if you do not have a backup to revert to. Take the time to make a backup of all your important files at the beginning. Believe me – you will be grateful you did!
2. Test Your New Design in a Test Area
Most modern WordPress designs come with a lot of customization options. It can therefore take a few hours to familiarize yourself with a new theme.
Always remember that the more preparation you do before you change themes, the less time your website will be offline to visitors. Your aim should be to minimize the time your website is offline.
Therefore, I recommend the following:
Installing a test WordPress website – This can be done locally or a sub-folder or sub-domain of another website you own.
Configuring your theme on your test website – Set it up exactly how you are going to set up on your live website.
Familiarize yourself with your new theme – Get to know how your new theme works. Test all options, even if you did not originally have plans on using them. You want to know everything you can about your theme. It is worth making some manual template edits too.
I recommend disabling all plugins when you initially activate your theme. This will allow you to see whether the theme works correctly out of the box.
You should then activate the exact plugins you use on your live website. The quickest way to do this is to download the plugins folder from your live website using a File Transfer Protocol (FTP) client and upload them to your test website. Then simply check the “Select All” button on your plugins page and activate them.
This allows you to see if any plugin you are using clashes with your new WordPress theme. If any do, you should contact the theme developer about the issue. Theme developers will usually change their code to ensure their design works with the most popular WordPress plugins. If the problem is is being caused by an unknown plugin, you may find that the developer will not help you. Should that happen, you need to decide how important that plugin is to your website. You can normally find a good alternative to every WordPress plugin, but if the plugin is vital to the success of your website, you may have to look for another WordPress theme to use. Look on the bright side: It is better to find out any problems like this on your test website, not your live website.
I also recommend importing posts from your live website so that your test website matches it. This will allow to populate your test website with real content from your live website, which helps you see how your content will look on your new design. Pay close attention to how featured images are displayed and whether you need you need to change any widgets you are using (some widgets don’t match up stylistically with some themes). You should also check the speed of your design how the design works on multiple browsers and devices, however I will speak more about this later.
In the past, it has sometimes taken me a few hours to understand a theme and get it exactly how I want it. I frequently come across small problems with a new theme when I do this. This is why it is vital that you familiarise yourself with your new theme before you upload it to your live website. You want your website to be offline for minutes, not hours or days.
3. Install a Maintenance Mode Plugin
It is important to put your website into maintenance mode whilst you are modifying it so that visitors do not see a half-built website. There are many great maintenance mode plugins available for WordPress such as Maintenance, Ultimate Maintenance Mode and WP Maintenance Mode. Once activated, search engines and visitors will not be able to view your website. Instead, they will see a message stating that your website is currently being updated.
Be sure to use a coming soon plugin and not a coming soon theme. A plugin will allow you to configure your theme in the background, whilst a theme will not.
4. Activate and Configure Your New WordPress Theme
With your website in maintenance mode, you can now upload your new theme to your website and begin to configure it.
Having tested your new theme thoroughly on your test website, you should not encounter any surprises when you activate your new theme on your live website. One of the first things you should still do is check that no plugins clash with the your new theme. If they do, deactivate all plugins and then re-activate them one by one until you see which plugin is causing the problem.
Then go into the theme options panel and ensure that you have configured the theme properly. It is tempting to rush this stage, however you should take your time to check each option has been configured correctly.
Sometimes your widgets will automatically populate your new theme. This usually happens when you change from a design with one widget area (e.g. sidebar) to another that has one widget area. Many modern WordPress themes have several or more widget areas, therefore you may find your widgets are scattered all over the place (e.g. in different widget areas or in the inactive widgets section). For reasons unbeknown to me, some widgets may simply be gone. Thankfully, organising the widget area of your new theme is never a big hassle if backed your widgets up previously. All you have to do is import them back and drag them to the correct widget area.
Next, you should check the text file in which you copied your code snippets (Google Analytics code etc). You can transfer the code over to your new theme easily using copy and paste.
The vast majority of WordPress themes use different dimensions for featured images and image thumbnails used in areas such as related posts, latest posts, featured posts etc. Therefore, you will need to regenerate your thumbnails in order for your images to be displayed correctly throughout your website. I recommend using the plugin Regenerate Thumbnails to do this. It is very easy to use and it has never failed to work for me in the past.
Once you have followed all of these steps, you should check your website thoroughly to make sure it looks exactly the way you want. Make sure you check every aspect of your website, including things such as the copyright in the footer.
Once you are happy that your new theme is configured correctly, you should deactivate and uninstall the maintenance mode or coming soon plugin that you were using whilst you were changing everything. Your new WordPress theme will now be live. If you followed all steps correctly and spent time familiarising yourself with your new theme on a test website, your website should not have been offline very long.
At this point, you can now uninstall any other plugins you no longer need, such as any widget backup and thumbnail regeneration plugins you used.
5. Test Your New Design
Your website may look great on your computer, but does it look good on all browsers and devices? With so many people browsing the internet using mobile devices, checking your theme looks great on all devices is essential.
Unfortunately, you cannot check your theme whilst your website is on maintenance mode unless you login to your website on dozens of devices and browsers. This is not practical. A better solution is to use a service that lets you check multiple devices and browsers at once.
Testing your design on multiple browsers and devices is something you can do when you are testing your new theme on your test website. This will allow you to pick up any problems before you make any adjustments to your live website. If you imported lots of posts and pages to your test website, you will have a good representation of how your new theme will be on your live website.
It is not always possible, or practical, to create a test website that is identical to your live website. Therefore, I recommend testing your design thoroughly on your test blog and after you have switched to the design on your live website.
A great service for checking your design on multiple browsers is BrowserShots. It will check your design against all major versions of available browsers (do not let the banner ads put you off). There are premium alternatives available too such as Browsera and CrossBrowserTesting.
For checking your website across multiple devices, I recommend Screenfly. It allows you to check your design on multiple variations of desktops, laptops, mobiles and television displays. You can also enter your own custom screen size.
One other thing I encourage you all to do is test the speed of your website once your new theme is activated. Ideally, you want to test the speed of a design before you even purchase it, however it is not always possible to get an accurate score as many theme developers use caching and content delivery networks on their demo websites to ensure their themes appear to be quick (this can hide the fact that a theme is frustratingly slow).
You should test the speed of your theme using your test website before using it on your main website. Again, unless your test website is identical to your live website, the score you receive will not be 100% accurate. It should, however, give you an idea of how quick the theme is. You can then test the theme again once it is live on your website.
Your website has to look good for everyone, not just desktop users. It is therefore vital that you test your design thoroughly. Testing your design is something you should do before and after changing to a new WordPress theme. It is too risky to wait until a theme is live on your website to discover major design compatibility flaws.
Overview
The key to changing a WordPress theme on a live website intelligently is backing up, testing your design, and minimising the time your website is offline. The process is not difficult, however if you cut any corners, you find yourself in a difficult position. In my experience, rushing the process of changing WordPress themes always causes more problems in the long run, therefore I encourage you to take a methodical approach to everything.
If you enjoyed this article, I encourage you all to subscribe to WP Hub. We have a lot of great articles coming over the next few weeks that you do not want to miss.
Twitter cards es un sistema de contenidos enriquecidos por el cual cuando compartes un enlace de tu web en Twitter aparece no solo el enlace sino una vista previa de tu publicación que incluye autor, sitio e incluso elementos multimedia.
Es interesante activar Twitter cards en WordPress porque su virtud principal es que incorpora autoría del contenido, de manera que aunque te hagan retuit quedará la “marca” del autor del contenido.
Resumen: el más común, con una imagen en miniatura y breve extracto del texto.
Producto: especializado para comercio electrónico, con varios campos configurables.
Foto: imagen grande que se visualiza con el visor de Twitter.
Galería: orientada a varias fotos.
Resumen con imagen grande: igual que el resumen pero con una imagen a mayor tamaño.
Reproductor: especializado para contenido de vídeo y audio. No funciona con todos los formatos así que revisa antes la documentación.
Aplicación: diseñado especialmente para las tiendas online móviles, revisa también la documentación.
Además, que incorporarlo a WordPress es muy sencillo, y hay varias maneras de hacerlo. Vamos a verlas …
Añadir Twitter cards manualmente
También es sencillo, no sufras …
Pásate por la página de documentación, donde te explica los metadatos que tienes que incorporar y cómo hacerlo, esta: https://dev.twitter.com/docs/cards/getting-started. Lo principal es que debes haber elegido el tipo de formato a mostrar ¿vale?.
Básicamente, la idea es incorporar en el archivo header.php de tu tema WordPress, antes del cierre de la etiqueta ‘head‘ las etiquetas meta necesarias:
En el ejemplo anterior he elegido el tipo de contenido “resumen largo” (summary_large_image), definido el Twitter del sitio (@ayudawp) y el autor (@fernandot), que debes cambiar a tus perfiles y formato de Twitter card, por supuesto.
Si quieres puedes generar las etiquetas meta en la página de validación, rellenando los campos disponibles, que verás que hay muchos más posibles:
Un buen consejo es que en vez de twitter:site y twitter:creator utilices twitter:site:id y twitter:creator:id, que son identificadores únicos de Twitter que no cambian aunque cambies el nombre de usuario. Si quieres saber tu ID de Twitter aquí lo explico: RSS feed de una cuenta de usuario (en el paso 2).
Hay un paso adicional que puede ser necesario en caso de que no se muestren las Twitter cards, y es comprobar que el fichero robots.txt pueda estar bloqueando el acceso a “rich media”.
Verifica que no haya una línea similar a esta:
User-agent: Twitterbot
Disallow:*
Y si existe la borras.
Twitter cards en WordPress.com
En realidad no tienes que hacer nada, pues ya vienen activas por defecto (algún plugin tienen instalado). Mi consejo es que te pases por “Ajustes -> Compartir” y conectes tu blog con tu cuenta de Twitter. De este modo el autor serás tu, y no @wordpressdotcom.
El formato que usa es el de resumen.
Twitter cards con WordPress SEO de Yoast
A pesar de que ya sabéis que no es mi preferido, el plugin WordPress SEO de Yoast incorpora lo necesario para generar Twitter cards. Solo requiere dos pasos:
Ve a la página de ajustes “Social” del plugin, y en la pestaña “Twitter” activa la casilla activar los para metadatos de Twitter Cards a la cabecera del sitio automáticamente. En el siguiente campo pon el usuario de Twitter para la autoría por defecto (sin la @).
Cada redactor del sitio debe pasar por su perfil de usuario y completar el campo de usuario de Twitter.
Y ya está. Por supuesto guarda los cambios en cada paso.
Con SEO Ultimate también puedes añadir Twitter cards mediante el generador de Rich snippets.
Añadir Twitter cards con plugins
Aunque se podría decir que acabamos de ver uno, en realidad es una opción de un megaplugin. Aquí lo que se trata es de plugins específicos para añadir Twitter cards. Vamos a ver los más utilizados …
JM Twitter Cards: además de ser muy completo es compatible con All in one SEO pack y WordPress SEO de Yoast, un gran punto a su favor, pudiendo elegir si se usa la configuración del mismo plugin o la definida en los plugins de SEO.
Twitter cards: simple pero muy fácil de poner en marcha.
Twitter cards meta: de los más completos, también incorpora un nuevo campo en los perfiles para sitios multiusuario.
Ographr: especializado en contenido multimedia, ofrece multitud de ajustes para visualizar vídeos y otros medios, no solo Twitter cards, sino en otras redes como Facebook o Google+.
Para finalizar … comprueba que funciona
Da igual el método que hayas elegido, cuando hayas terminado pásate por la página de validación de Twitter cards y comprueba que se muestran correctamente. Si no salen a la primera inténtalo después de unas horas, no es inmediato.
En la pestaña “Validate & Apply” introduce la url de tu web y haz clic en “Go”, te dirá al instante si es se puede ya validar.
En caso de estar preparada verás una pantalla con una vista previa donde debes hacer clic en “Request Approval”.
Esto es casi inmediato, y si refrescas aparecerá ya cómo validada …
Una de esas mañanas de lunes en las que entra una luz gris y perezosa por la ventana, cuando fuera llueve y hace frío y lo que más te apetece es irte a casa a envolverte en una manta con un buen libro y morirte lo que le quede al día, llegó ella.
MKII y yo estábamos apaciblemente en el despacho haciendo el equivalente a lo antedicho pero en plan informático: “documentarnos y formarnos como informáticos de bien”. Y entonces llegó ella.
Vino de la mano de la jefa de Recursos Humanoides. Literalmente. La jefa altiva y taconazo, con aire de dominio. De la mano le colgaba una muchacha que no llegaba a la veintena. Así a bote pronto no destacaría por nada en especial si me la encontrase por la calle. La hubiese tomado por una psicópata cualquiera, del montón. Pero está aquí, en mis dominios. Con esos ojos. La cara sin maquillaje, despejada, con su mechoncito de flequillo como al descuido, ropa más o menos normal dentro de lo que mis conocimientos de moda pueden considerar normal.
Pero con esos ojos.
No tenían nada de especial. Ojos, al fin y al cabo. Uno a cada lado de la nariz, marrones y húmedos. Lo normal en unos ojos. Salvo que éstos se movían con una rapidez ansiosa. Mientras la cara componía un rictus sereno, casi inerte, los ojos escrutaban cada rincón deteniéndose sólo una décima de segundo. Rápida y metódicamente escaneaba todo el perímetro mientras avanzaba por el departamento hacia mi mesa. Casi podía escuchar los chasquidos de la cámara de fotos que parecía llevar incrustada en la cabeza la criatura.
Al fin llegan a nuestros aposentos y se sitúan en medio.
-Hola chicos-, dice la señora Havenocon, nuestra flamante jefa de Recursos Pseudo-Humanos.- Os presento a Daisy.
Me levanto y le doy la mano a Daisy. Qué bonito nombre. Y qué mano más fría. Más que el culo de Esperanza Aguirre. Daisy aprovecha el momento del apretón para hacerme un escáner completo, un inventario de huesos y una medida de masa corporal al vuelo.
-Encantado, Daisy.
-Daisy viene para hacer las prácticas de un curso de informática que está haciendo.
-¿Ah si? ¿Y de qué es el curso?-, pregunto sin dirigirme a nadie en particular.
-De microinformática, ¿no, Daisy?
-S..sí-, dice tímidamente.
-Estupendo. Y que te la cuidemos, ¿no?
-Tratadla como una más, ¿eh?
-Vale. ¿Come sola? ¿Hay que sacarla a la calle a que haga pis?- Daisy deja de escanear el techo, frunce el ceño y me mira fijamente. Se me recalienta la frente y me aparto de su campo visual para que no pueda concentrar durante más tiempo su láser mortífero. Me sigue con la mirada.- ¡Pues claro que la cuidaremos, mujer! ¡Como si fuese de tu familia, hombre!
-No, pero no es…
-¡A que sí, MKII! ¡Una pupila a la que ilustrar con tu Emececosas! – MKII asiente con una sonrisa.
-Vale, vale, bueno, ya me contearéis…- dice Havenocon con cierta desconfianza-. Hasta luego.
-¡Hasta luego tita!- dice con una vocecita 8 años menor que ella. Ojalá diga pronto “Os voy a comer el corazón a todos” cuando esté rodeada de lusers. Así que es su sobrina. Mola.
Havenocon se marcha por el pasillo con cierta prisa, y en la curva del final, incluso da una carrerita. Daisy sigue escaneando el departamento. Se percata de que la estoy mirando y enfoca de nuevo su láser. Frunce el ceño. Los labios, una raya pequeña.
-Bueno. Así que estás estudiando Microinformática. Es divertido, ¿no te parece?
-Sí. Me gusta desmontar cosas.
-A mi también. Bien, si aquí a mi amigo MKII, que es el que parte el bacalao aquí le parece bien, creo que tu primera tarea será montarte un ordenador para ti.
Sus ojos se iluminan como los de un niño en una juguetería cuando abro los armarios de repuestos en plan escoge un arma, Neo. Le doy una carcasa vacía y con una reverencia le dejo vía libre a los componentes y le digo: “hala, llénala”.
Me vuelvo a mi sitio con intriga. Hago como que trabajo pero estoy pendiente de si sabrá, primero, montarse un ordenador con los cachos que hay en los armarios. Debería, por su formación. Y de paso, si atinará con los componentes a la primera.
Se pasea de armario en armario con avidez y de vez en cuando saca una pieza y la pone sobre una mesa. Cuando se da por satisfecha viene hacia mi puesto. MKII la mira desde su mesa. Se coloca delante de mi mesa, envarada y me mira con sus ojos inhumanos, como si pudiese ver a través de mi.
-Destornillador- me dice la criatura, con la educación de un motor diésel-. Y tornillos.
-En el banco, ahí detrás hay de todo.
Se va al banco de trabajo, coge lo que le parece y se va hacia su criatura por montar.
Veo que comienza metiendo las espigas para la placa base. Muy bien. Después atornilla la fuente. Yo hubiese metido primero la placa base, pero bueno, ésto es como limpiarse el culo: hay quien arruga el papel y otros lo doblan. Va metiendo componentes, pero desde esta distancia no veo qué le pone.
¡Bimbambidubi! ¡Dubi!
-Hola, hermano, ¿has encontrado a Jesús?
-¿Qué Jesús?- vaya, Auspiciano Lag.
-¡Por el culo te la hinco!
-¡Wardog! ¡Que tengo un problema!
-Pues qué suerte. Yo tengo más de uno. Te gano.
-No… que no imprime.
-¿Y le has dado a imprimir?
-¡Claro!
-¿Con el ratón o con el teclado?
-¿Se puede imprimir con el teclado?
-No. Hay que imprimir con la impresora.
-No te entiendo.
-Que si le has dado al muñequito de la impresora.
-Sí. Un montón de veces.
-Vale. ¿Y por qué impresora lo mandas?
-¿Y cómo voy yo a saberlo?
-Claro. Qué tonto soy. Disculpa por haber pensado que sabías qué coño estabas haciendo.
Veo pasar en ese momento a Daisy hacia el banco moviendo la coleta y con la mirada fija al frente.
-Y dime, si no sabes por qué impresora has mandado, ¿cómo sabes que no imprime?
-¡Porque no sale nada!
-¿Por qué impresora?
-¡No sale nada por ninguna! ¡Deja de perder el tiempo!
-¡Eso intento pero no me dejas!
Daisy pasa otra vez de vuelta a su PC a medio montar con uno alicates de corte en la mano. Hija de puta. Esta criatura no atasca.
-Espera, Auspiciano, que te mando a alguien.
-¡No! ¡Ven tú!
-No, que me tocas el culo, guarro.
Clic.
-Daisy, bonita, ¿qué vas a hacer con los alicates?
-No entra la RAM.
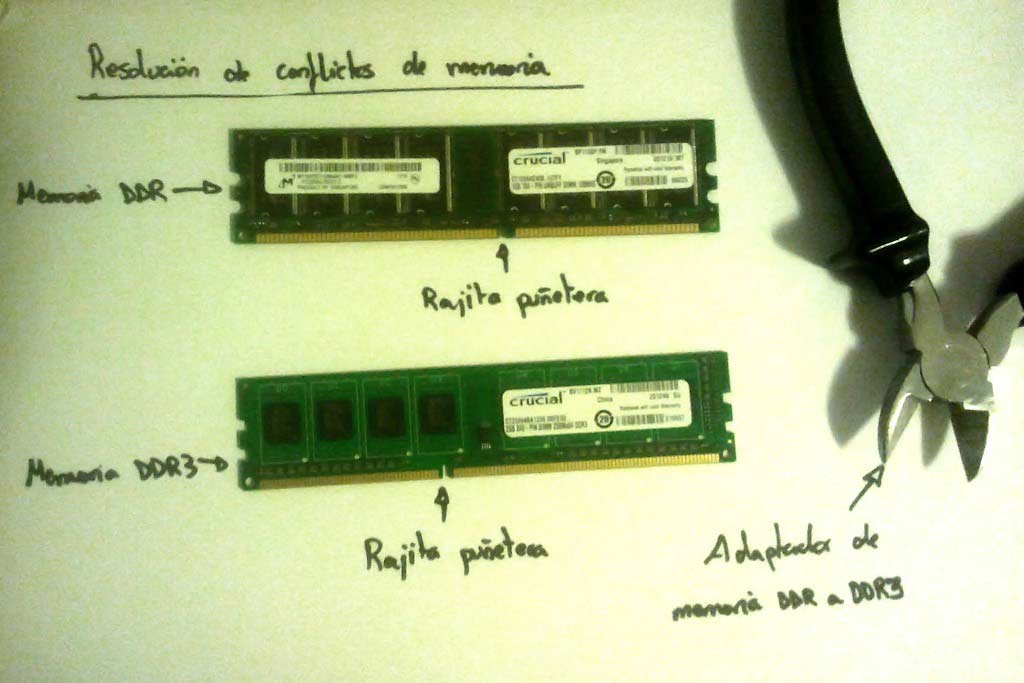
-Déjame ver… – me acerco a ver el interior de la carcasa. Ha elegido una placa AMD AM3 y dos módulos de memoria DDR. Si hay algún lego en la materia en la sala, por favor, sírvase de visualizar la siguiente imagen para comprender por qué Daisy, en ese momento perdió mi respeto.
Adaptador de memoria DDR a DDR3 por cojones edition.
Que de todo tiene que haber en la vida. Y yo, que inocentemente pensaba que tenía ante mi un ser puro, libre de todo condicionamiento social, de remordimiento y de compasión. Y no. Simplemente es que está asilvestrada, la criatura.
Pero no se puede negar que tiene iniciativa y recursos. Si no entra la memoria, se le corta un cacho. Ya resolveremos después el tema del número de contactos y voltajes.
Decido en ese momento que mejor, la aprovechamos para otras cosas. Ya que la vamos a tener un tiempo en prácticas, que desarrolle habilidades más acordes a su natural disposición.
-Mira, Daisy, que tenemos que atender una incidencia de un señor con una impresora. ¿Te apuntas?
Me mira largo rato. Miro su mano derecha y tiene los dedos blancos de apretar los alicates. Al final afloja la presión, pero no los suelta.
-Vale. Luego termino esto.
Me la llevo hacia el hábitat de Auspiciano.
-Ya que estamos aquí voy a por un café. ¿Quieres?
-Yo no bebo-, me dice. Y yo la creo. Estoy convencido de que, por su falta de humanidad ni bebe, ni caga, ni siente dolor.
-Espera aquí entonces.
Voy hasta la máquina del café, saco uno y vuelvo hacia donde la dejé. No se ha movido ni medio milímetro.
-Mira, es aquel señor.
-¿El calvo con gafas?
-No seas maleducada. Es el otro, el señor mayor con cara de gilipollas con la camisa con manchas de sudor en los sobacos.
-Ah.
-Ve, a ver si eres capaz de solucionarlo.
Ni me mira ni me dice nada. Se va de mi vera como se va una roca gigantesca montaña abajo. Con la sencilla inevitabilidad de una puta avalancha.
Desde mi puesto de guardia, vigilo la estepa. Auspiciano sentado en su silla. Daisy delante de él. Ella no mueve la boca. Él si. Ella permanece impasible y le mira, sujetando unos alicates de corte en su mano derecha. Por fin, Daisy dice algo. Auspiciano se vuelve en todas direcciones hasta que me localiza. Me hace señas con la mano para que me acerque. Querrá que le traduzca.
-¿Qué pasa, Auspiciano?
-¿Quién es esta chica?
-La sobrina de la jefa de RRPHH.
-¿Y no puede decir qué es lo que quiere?
-Quiere arreglar tu problema con la impresora.
-¡Ah! Por eso ha dicho “impresora”…
-Pues claro, si no, hubiese dicho psiquiatra. Es que es tímida. Explícale, que está de prácticas.
-Mira, bonita-, Daisy aprieta los labios hasta que forman una fina línea. En este momento está planteándose arrancarle el bazo vía pabellón auditivo.- Resulta que yo le doy aquí al muñequito de la impresora y no hace nada. ¿Lo ves?
Daisy se agacha, mira por debajo de la mesa, mira en derredor.
-¿Por qué impresora estás imprimiendo?
-Por… ¡y cómo quieres que lo sepa! ¿Es que todos los informáticos sois iguales?
-No, Auspiciano-, intervengo-. Sois vosotros los que sois iguales. ¿Qué impresoras usas?
-Las del pasillo.
-¿Ves cómo no era tan difícil?
Daisy sale disparada hacia el pasillo. La sigo por ver qué hace, porque tiene los alicates en la mano y me da miedo que se encuentre con Gargamel y le mutile la pichorrilla.
Se va hacia las impresoras y las mira. Enseguida una de ellas le llama la atención. La que dice “Cargue papel en bandeja 2″. Tantea los cajones de la impresora. Sabe qué hay que hacer. Pero no identifica la bandeja 2. Me mira. La dejo hacer.
Para mi sorpresa, me da los alicates, que a la sazón están calientes como salidos de un horno. Parece tener un momento de epifanía. Saca la bandeja uno. Y la dos. Y la tres y la cuatro. Todas vacías. Las amontona, las carga y se vuelve para el despacho de Auspiciano. Da cosica ver una cosa tan pequeña con un bulto tan grande. Pesar no pesa pero no veas lo que abulta, si parece un seto con patas.
Llegamos de vuelta al despacho de Auspiciano. El hombre está trabajando absorto con su calculadora cuando se le presenta Daisy con cuatro bandejas de la impresora en el despacho, las suelta en el suelo con la delicadeza de una ballena azul haciendo una histerectomía. El estruendo asusta levemente a Auspiciano. Cuando el hombre acierta colocarse las gafas y se traga de nuevo el corazón, por fin enfoca la vista. Mira las bandejas y mira a Daisy, de pie a la entrada de su cubículo.
-Llénalas-. Dice la niña con la naturalidad y la llaneza de una nevada de quince metros.
-¿Qué… qué es ésto?
-Bandejas de impresora, Auspiciano. Ahí es donde se mete el papel, hijo.
-¿Y cómo se pone?
-Joder. Veinte años en la empresa y no has cargado nunca papel a la impresora. Habría que darte una medalla en vagancia.
-Llénalas-, repite Daisy .
-Pero…
-Yo le haría caso, Auspiciano. O le devuelvo los alicates.
Auspiciano, refunfuñando, se levanta, coge unos paquetes de folios y, tras darse cuenta de que sólo caben en una posición, carga las bandejas y termina sudando por el esfuerzo mental.
Daisy las amontona de nuevo e intenta levantarlas pero no puede.
-Ayúdame-, le dice. Auspiciano ni rechista. Coge dos bandejas y ella otras dos. Yo voy tocando las palmas mientras alucino por todo lo alto. Llegan a la impresora. Daisy mete sus dos bandejas en la impresora-. Mete las bandejas-, le dice a Auspiciano. El hombre, como en trance, ni se lo piensa. Coloca las bandejas en las guías y empuja hasta que encajan. Al poco, la impresora se pone en marcha y saca todas las impresiones de Auspiciano.
-Pero ésto está mal-, dice, meneando la cabeza-. Sale todo repetido.
-Pero eso es por el dedo, macho. Como no se está quietecito cuando las cosas no funcionan a la primera, repite las impresiones. Pero si quieres le digo a Daisy que te lo arregle-, le digo al tiempo que le devuelvo los alicates a la chica. Un brillo acerado refulge en sus ojos.
-No, no, da igual. Ya me lo guardo para tomar notas por detrás.
-Ale, pues a seguir bien.
Auspiciano se larga pasillo adelante, con muestras de haber sufrido un shock. Daisy me mira fijamente, esperando comandos. Hago una reverencia.
-Milady, me ha impresionado usted.
Daisy apenas curva la comisura de los labios hacia arriba dos milímetros. Es una sonrisa.
Volvemos al despacho y la ayudo para que termine de montar su ordenador aportándole las piezas correctas. Quizá me precipité juzgándola por su falta de experiencia. Esta criatura tiene un don natural para el BOFHing y para desarrollar varias psicopatías en cadena.
A la hora de comer, vuelve su tía para llevársela, pues ya ha terminado su jornada de prácticas por hoy.
-¿Qué tal se le da?-nos pregunta.
-Bien, un poco verde. Ha montado su equipo y está preparado para instalar el sistema operativo mañana.
-Ah, muy bien, muy bien…- dice Hasnocon sin tener ni puta idea de qué le he dicho.
-Y ha resuelto un problema que llevaba enquistado en la empresa desde hace veinte años-, añado.
-¿En serio?- me pregunta incrédula-. ¿Qué problema?
-No te puedo contar, porque es muy técnico, pero su solución me ha sorprendido por su sencillez y eficacia.
-¡Madre mía mi niña! ¡Qué orgullosa me tienes! Para que Wardog diga algo bueno de alguien tiene que ser… ¡Ay mi niña!
Se marchan de la mano entre besos y mimos. Daisy hace su papel de sobrina humana y se va tan pancha.
Cuando ya se han ido, MKII se me acerca y me pregunta:
-¿Qué problema ha resuelto si casi monta el ordenador a martillazos?
-Ha conseguido que Auspiciano Lag ponga papel en la impresora.
-Jo-der. Es buena.
-Tiene un don. Es una fuerza de la naturaleza.


 HTML5Form Input Validation Using Only HTML5 and RegexMonty Shokeen
 Web DevelopmentSubmit a Form Without Page Refresh Using jQueryEric
 PHPCreate a Contact Form in PHPMonty Shokeen
 PHPComparing the 5 Best PHP Form Builders (And 4 Free Scripts)Monty Shokeen
 JavaScriptBest JavaScript Forms of 2019Monty Shokeen
 FormsCreate a Stylish Dark Contact Form with HTML, CSS, and JavaScriptGeorge Martsoukos
 JavaScriptCreate a JavaScript Contact Form With the Smart Forms FrameworkMonty Shokeen
 JavaScriptHow to Create a Web Booking Form With the Smart Forms ScriptMonty Shokeen